
IAN 96683
11
12
LR03 1,5V
2x AAA
8
9
10
4
5
6
7
7
1
2
3
close open
4x AA
4x AA
CYGB
Introduction
Congratulations on the purchase of your new device.
You have chosen a high-quality product. This manual is part of the product. It includes
important information on safety, installation and disposal. Before using the product, please read the operating
and safety instructions carefully. Use the product only as described and according to its intended use. Include
all documentation when passing the device on to third parties.
Intended use
This product is intended as lighting for bicycles. LED bicycle lamp set is approved as sole lighting for all bicycle
types. Light distribution must not be obstructed by any other bicycle components or pieces of baggage. The
product is intended for use outside. Any use other than specified here or modification of the product is not
permitted and may lead to injuries and damage to the product. The manufacturer does not accept any liability
for damage caused by improper use. The product is not intended for commercial use.
Scope of delivery
1 Front light, 1 Rear light, 1 Front light holder,
1 Rear light holder, 4 AA rechargeable batteries, 2 AAA batteries,
Manual, Rubber reducers
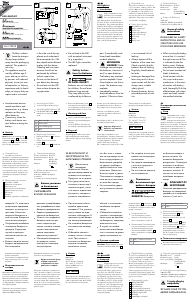
Teilebeschreibung
A Front light B Rear light
C Front light holder D Rear light holder
E Power button- front light F Power button- rear light
G Battery indicator- front light H Battery indicator- rear light
I Battery charging socket J Angle adjustment screw - front light
K Retaining screw- Front light holder L Retaining screw- rear light holder
M Front light arrest N Rear light arrest
O Rear light rubber strap P Battery cover- front light
Q Battery compartment- front light R Battery cover- rear light
S Polarity connection charger T Rubber reducers
Technical data
Front light Rear light
Type designation: XC-112B / L-Lux 2.0 Type designation: XC-117B / D-LED
Nominal power: 0,5 Watt Nominal power: 0,2 Watt
Protection class: IP44 acc. to DIN EN 60529 Protection class: IP44 acc. to DIN EN 60529
Rechargeable Batteries: 4 x 1.5V AA LR6 Batteries: 2 x 1.5V AAA LR03
Note
Please only use alkaline batteries or comparable rechargeable batteries with 1,2V.
Safety note
WARNING!
RISK OF DEATH OR INJURY TO INFANTS AND CHILDREN!
Never leave children unattended with the packaging material as there is danger of suffocation by swallowing
packaging parts. Children often underestimate dangers. Always keep the product away from children. The
product is not a toy! This product is not intended for use by persons (including children) with reduced physical,
sensory or mental capabilities or lack of experience or knowledge, unless they are supervised by a person
responsible for their safety.
Please note that damage due to improper use, non-observance of the manual or intervention by non-authorised
persons is excluded from statutory warranty rights.
Do not disassemble the product. Improper repairs may lead to serious risks for the user. Repairs may only be
performed by authorised specialists. LEDs cannot be replaced.
Safety notes for batteries:
Keep batteries away from children, do not expose to fire or short-circuits or take them apart.
Observe polarity when inserting. Clean battery and device contacts before inserting if necessary.
Immediately remove empty batteries from the device! Increased risk of leakage!
Never expose batteries to excessive heat by sunlight, fire or similar.
Increased risk of leakage!
Non-compliance may lead to batteries being discharged beyond their final voltage and leaking! Remove
batteries immediately to avoid damage.
Avoid contact with skin, eyes and mucous membranes. If exposed to battery acid, wash the affected area
immediately with plenty of clear water and seek medical attention.
Always replace all batteries at the same time.
Only use batteries of the same type. Do not combine different types or used batteries with new batteries. Ensure
that the device is switched off after use. Remove batteries if the device is not used for long periods of time.
WARNING!
Do not recharge batteries! Risk of explosion!
NOTE!
If the red battery indicator on the front light G or rear light H is flashing, replace batteries or
recharge rechargeable batteries immediately.
Please observe that the lights no longer comply with the German road traffic registration regulation (StVZO) if
the battery indicator flashes.
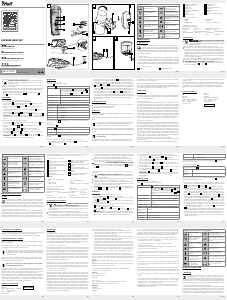
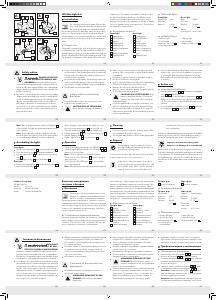
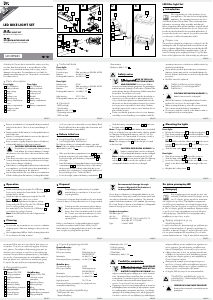
Installation of front light
1 Screw out retaining screw K from holder C . 2 Position holder C at the desired location of the handle
bar. If necessary, use the rubber reducers T to ensure optimum fitting. 3 Screw in retaining screw K again.
Tighten the screw firmly. Do not use any tools in order to avoid damage. To set the optimum angle for the
direction of travel, unscrew the angle adjustment screw J with a cross-top screwdriver by 2-3 turns. Set the
desired angle and screw the angle adjustment screw J in tightly.
4 Slide the front light on the holder until it clicks in place. To release it, press the front light arrest M and slide
the front light to the front from the holder.
Front light charging option
The front light offers the option of connecting a charger I to recharge rechargeable batteries inserted into the
front light. Rechargeable batteries and charger are not included in the scope of delivery.
We recommend the use of a charger with a 3.5mm charging-connection with an output of 6 V DV max. The
polarity of the connection is displayed in the symbol S on the front light.
Please, only use chargers from specialist retailers. Please contact an expert.
Safety note, warning!
Risk of death and injury
Using the wrong charger may lead to damage, overheating or even explosion of the front light. In
this case, the warranty will expire.
WARNING!
Do not recharge batteries! Risk of explosion!
Cleaning
Clean the LED bicycle light set with a damp, lint-free cloth.
Note
Never emerge the light in water. Do not use corrosive or abrasive cleaning agents. This leads to
damage to the light.
Dispose of packaging and devices
in an environmentally friendly way!
Note on the disposal of batteries:
Low and empty batteries may be disposed of free of charge at official collection points, battery retailers or
recycling points.
Consumers are legally required to dispose of batteries at aforementioned battery collection points.
Below is the meaning of the symbols indicated on the batteries.
Do not dispose of batteries with household waste.
Batteries containing hazardous substances are additionally marked with the chemical symbol of the respective
substance:
- Pb: Lead - Hg: Mercury; - Cd: Cadmium
If batteries are not disposed of properly, valuable resources are lost and the hazardous substances contained
in the batteries may lead to risk for health and the environment. Separate collection/disposal of old batteries
helps to prevent risks for health and the environment. Valuable resources are regained by recycling.
Note on the disposal of device and packaging:
The packaging can be disposed of at local recycling points. For details, refer to your local authority.
Exclusively environmentally friendly materials have been used. If this product is to be disposed of,
do not throw it into household waste. Dispose of it appropriately according to your local guidelines. For further
information, refer to your local authority.
Inserting rechargeable batteries/batteries into the front light
5 Slide back the cover P of the front light. 6 Remove the cover and take out the battery compartment Q of
the front light. 7 Insert rechargeable batteries on the top and bottom into the battery compartment. (4x AA,
1,5V). Observe polarity when inserting the batteries. Afterwards, reassemble the light.
Installation of rear light
8 Attach the holder D with the rubber strip O to the seat post or the rear stay. Make sure that no objects are
covering the rear light. Tighten the rubber strip and hook it in. 9 Loosen the retaining screw L on the bracket
and adjust it until the desired angle is reached. Then, re-tighten the screw. Tighten the screw hand-tight. Do not
use any tools for this in order to avoid damage.
10
Slide the rear light onto the holder until it clicks in place.
To remove it, pull the rear light arrest N downwards and pull off the rear light.
Insert the battery into the rear light
11 Slide back the cover R of the rear light. 12 Insert the batteries into the battery tray (2x AAA, 1,5V)
Observe the correct polarity. Then, put the lamp back together.
Operation
The lamp has two brightness levels. Push the On/Off button E once to activate the Power mode
(20 lux) for cycling in unlit surroundings. Push the On/Off button E twice two activate the Eco mode
(10 lux) for cycling in lit surroundings. By pushing the On/Off button E again once (Eco mode) or
twice (Power mode), the lamp is switched off again. The rear lamp is switched on and off with the On/
Off switch F .
Safety note!
WARNING!
RISK OF DEATH AND INJURY!
Never recharge the batteries provided with the device. Risk of explosion!
Declaration of conformity
KLB GmbH declares that this product with the following name conforms to applicable standards and EC
Directives.
EMC Directive 2004/108/EC and Directive 2011/65/EC (RoHS), LVM Directive 2006/95/EC. CB, GS, CE.
The following standards were taken as a basis:
DIN EN 55015:2009, DIN EN 61547:2010, DIN EN 6100-3-2:2010, DIN EN 61000-3-3:2009 and DIN EN
62321:2009, EN 61558-1:1997+A1+A11, EN 61558-2-6:1997, EN 60335-2-29 (latest version) DIN 33958.
Type designation: XC-112B / L-Lux 2.0; XC-117B / D-LED; IAN 96683
Münster, G ermany 01.12.2013
Warranty provisions
Dear customers,
You will receive 3 years of warranty from the date of purchase. In case of faults to this product, you are entitled
to legal rights against the seller of this product. These legal rights are not limited by the warranty as described
below.
Warranty conditions
The warranty period begins with the date of purchase. Please keep your original receipt. It is required as
proof of purchase. If any material or manufacturing fault occurs regarding this product within three years
from date of purchase, the product will either be repaired or replaced by us free of charge, at our own
discretion. This warranty requires that the proof of purchase (receipt) as well as the faulty device be presented
to us within the period of three years with a short, written description of the fault and when it occurred. If the
fault is covered by our warranty, you will either receive a repaired or a new product back from us. With the
repair or replacement of the product, no new warranty period begins.
The warranty period is not extended by statutory warranty rights. This also includes replaced and repaired
components. Damage and faults at purchase must be reported immediately after unpacking the device.
Repairs after expiry of the warranty period are subject to charge.
Extent of warranty
The device was carefully manufactured under observation of strict quality requirements and thoroughly
tested before delivery. The warranty applies to material or manufacturing faults. It does not include product
components which are subject to normal wear, and therefore regarded as wear parts, or damage to fragile
components e. g. switches, rechargeable batteries or glass parts. This warranty expires if the product is not
maintained or used properly or when damaged. For proper use of the device, all instructions included in the
manual must be observed.
Applications or handling which is inappropriate according to the manual must be avoided. The product is only
intended for private use, not for commercial use. The warranty expires in case of inappropriate use, the use of
violence, and modifications not performed by one of our authorised service providers.
Please observe the following instructions to ensure proper processing of your request:
• Pleasehaveyourreceiptandthearticlenumberreadyasproofofpurchasewhenmakinganinquiry.
• Thearticlenumbercanbefoundonthenameplateoronthecoverofthismanual.
• Incaseofmalfunctionsorfaults,pleasecontacttheservicedepartmentbelowbyphoneoremailasarst
step.
• Products registered as faultfaulty can be returned free of charge to the service address given to yo
u
including proof of purchase (receipt) and information about the fault and when it has occurred. Please note
that the service department must be informed before sending the device.
Manuals, including this one, product videos, and software can be found at www.lidl-service.com.
SERVICE + SUPPLIER SERVICE + SUPPLIER
KLB GmbH KLB GmbH
Diekbree 8 Diekbree 8
48157 Münster, Germany 48157 Münster, Germany
Tel: +49 2 51 132 37 57 Tel: +49 2 51 132 37 57
E-Mail: gb@klb-service.eu E-Mail: cy@klb-service.eu
www.klb-service.eu www.klb-service.eu
IAN 96683 IAN 96683
Information date: 12/2013
Version: 14105/14106 - CY
GB CY
Front light Rear light
LR6 1,5V
LR6 1,5V
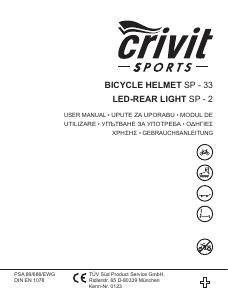
LED Bicycle Light Set
IAN 96683 / Article 14105
IAN 96683 / Article 14106


Λάβετε μέρος στη συζήτηση σχετικά με αυτό το προϊόν
Εδώ μπορείτε να μοιραστείτε τη γνώμη σας για το Crivit IAN 96683 Φως ποδηλάτου. Εάν έχετε κάποια ερώτηση, διαβάστε πρώτα προσεκτικά το εγχειρίδιο. Το να ζητήσετε ένα εγχειρίδιο μπορεί να γίνει χρησιμοποιώντας τη φόρμα επικοινωνίας μας.