Français
4239 000 39803
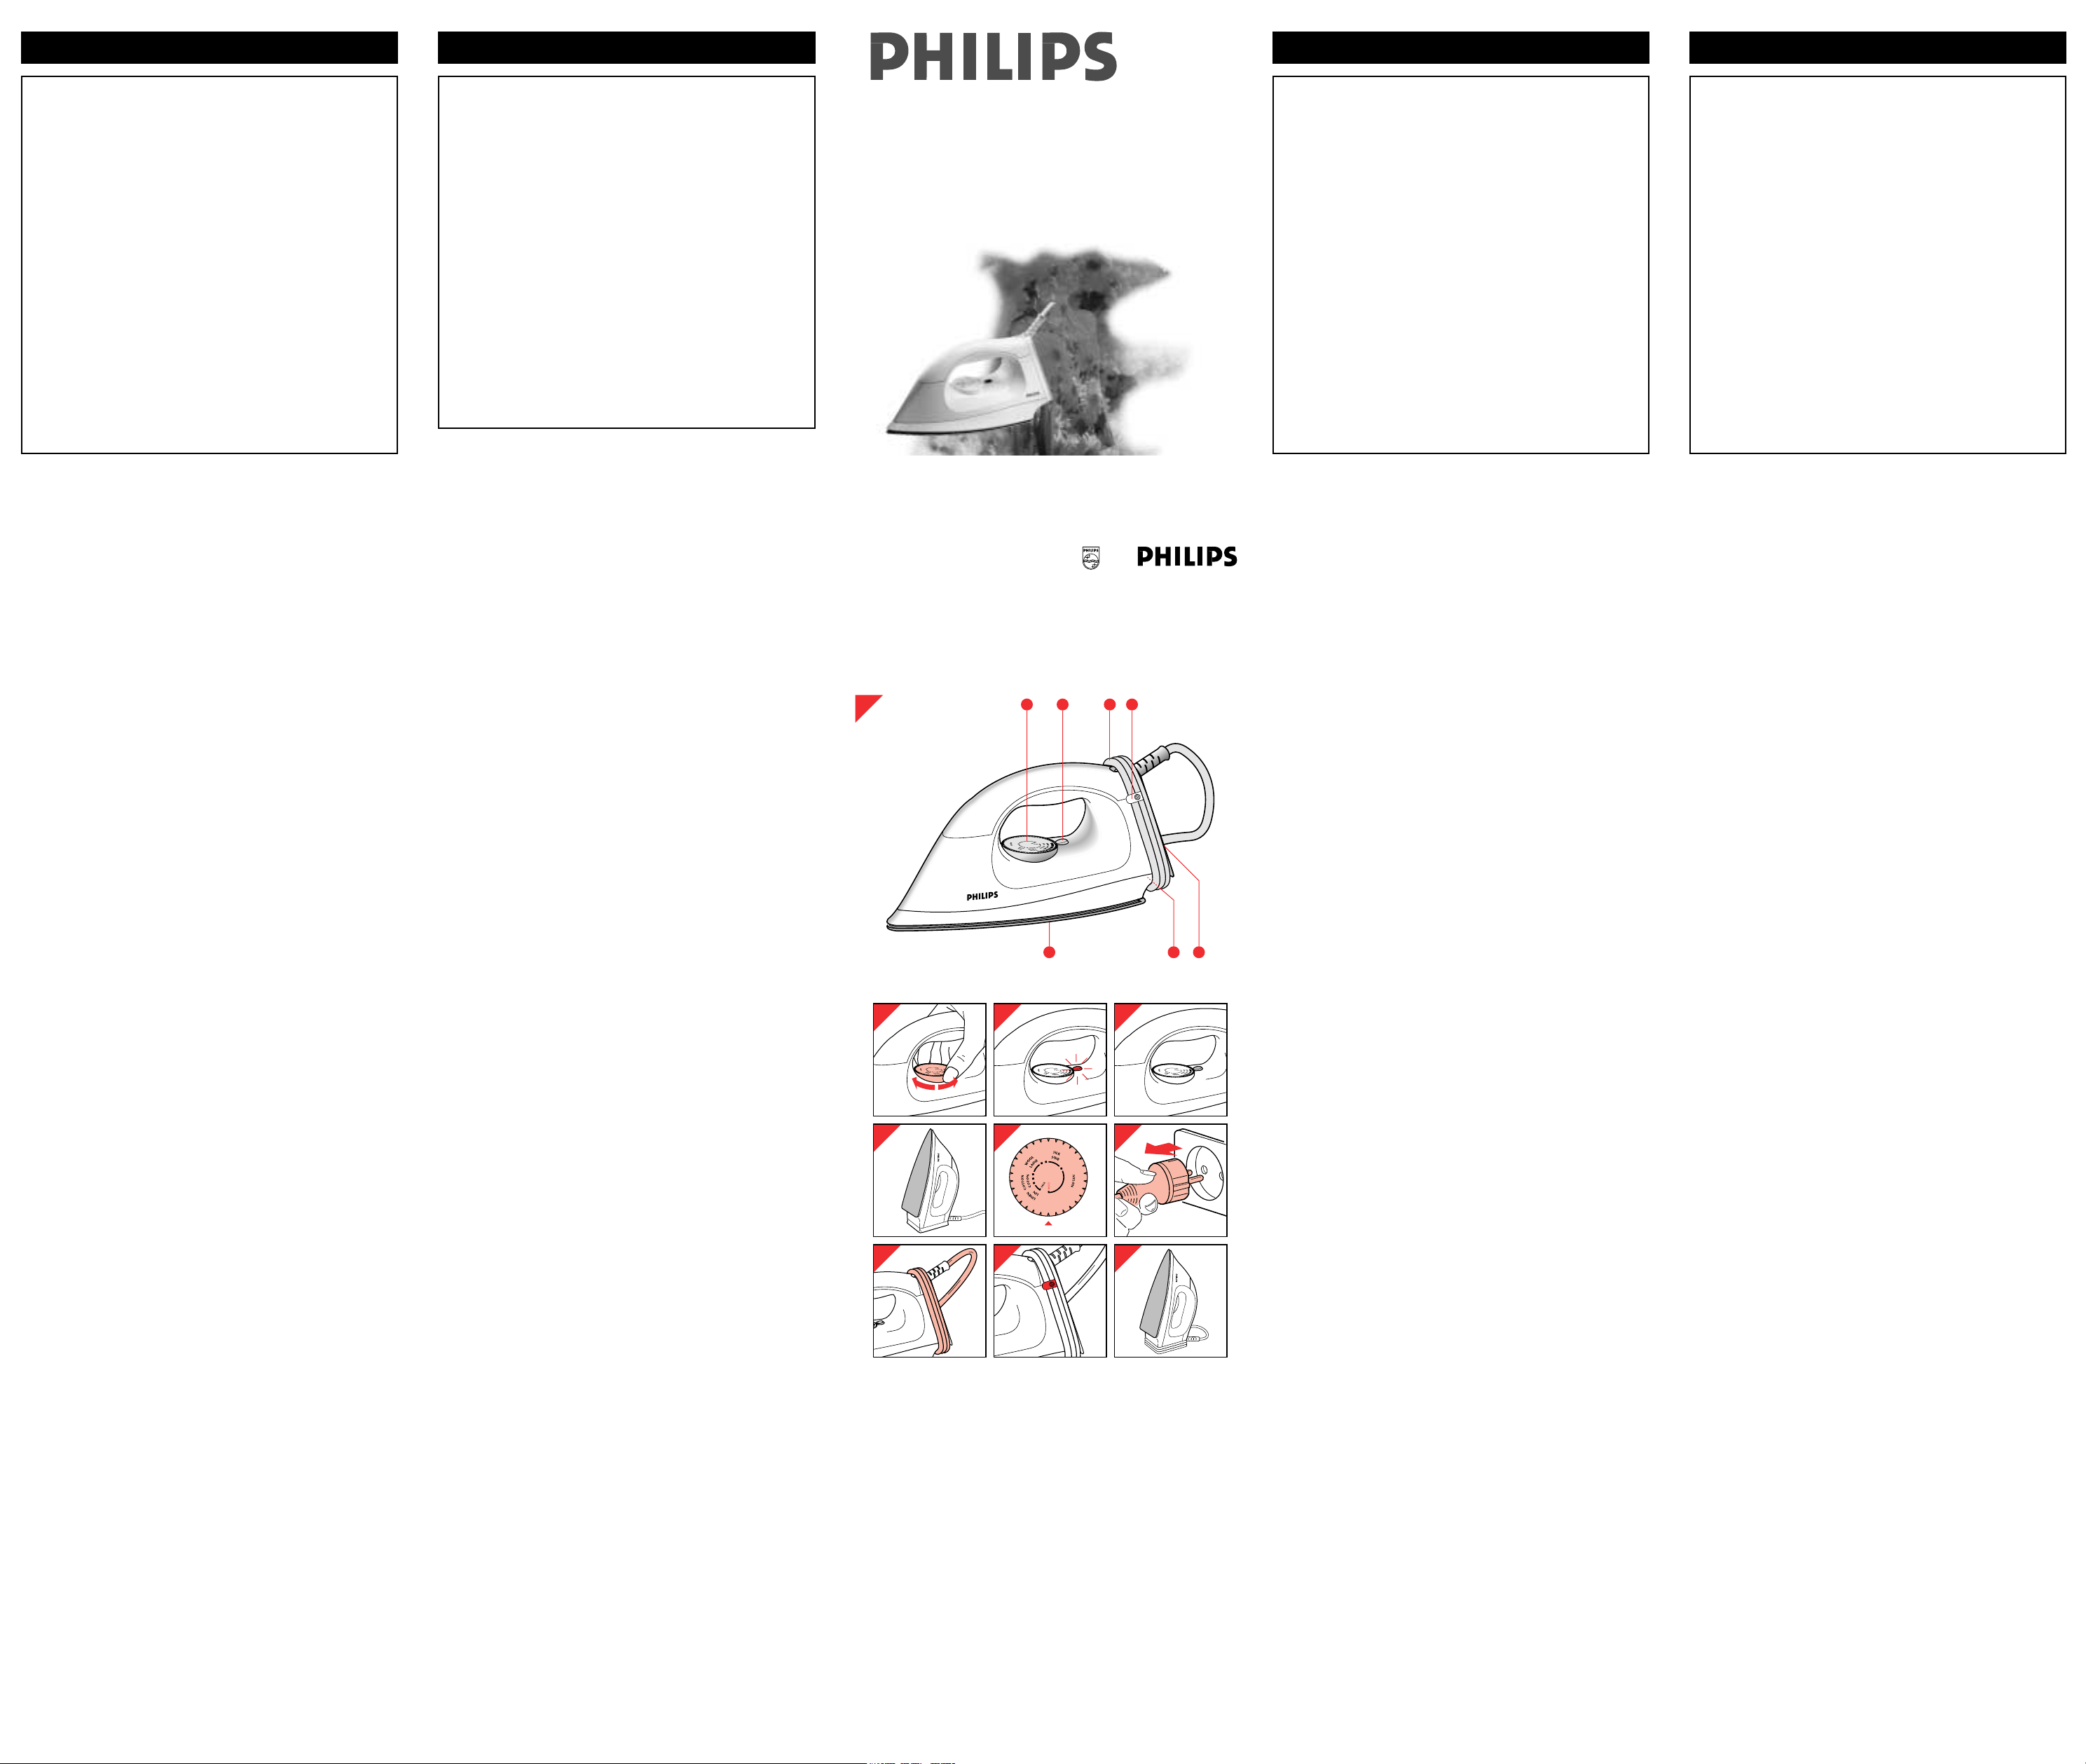
General description (fig. 1)
A Temperature dial (rotate)
B Soleplate
C Temperature marking (type HI 105)
Temperature marking/pilot (other types)
D Type plate
E Rear side
F Mains cord
G Cord clip
Ironing temperature
• Always check first if a label with ironing instructions is attached to the
article to be ironed. Follow these ironing instructions in all cases.
• If ironing instructions are missing but you know the kind of fabric, select:
1 (low temperature) for synthetic materials (e.g. acetate, acrylic, viscose,
polyamide, polyester) and for silk;
2 (moderate temperature) for wool;
3 (hot) for cotton and linen.
• These instructions are valid for the fibre materials only. If some kind of
finish has been applied (gloss, wrinkle, relief etc.), the textile can best be
ironed at a lower temperature.
• First sort out the fabrics according to ironing temperature: wool with wool,
cotton with cotton, etc.
• The iron heats up quicker than it cools down. Therefore, start ironing the
articles requiring the lowest temperature such as those made of synthetic
fibres. Then progress to the higher temperatures. Finish by ironing cotton
and linen.
• If the article is made of a mixture of different fibres, you must always
select the lowest ironing temperature of the composition of those fibres.
(E.g. an article consisting of "60% polyester and 40% cotton" should be
ironed at the temperature indicated for polyester (1).
• If you do not know what kind(s) of fabric(s) the article has been made of,
find a spot which will be invisible when wearing or using the article to try
out the ironing temperature. (Always start at a low temperature and
increase to one which gives the required results.)
• Velvet and other textures which rapidly acquire shiny spots should be
ironed in one direction only (with the nap), applying only light pressure.
Always keep the iron moving.
• Iron the reverse side of synthetic materials and silk to prevent shining
spots.
Setting the temperature
- Set the appropriate ironing temperature by means of the temperature dial
(fig. 2).
Rotate the temperature dial so that the required temperature indication on
the dial meets the dot (type HI 105) or pilot light (other types) on the iron
(fig. 3).
- Insert the mains plug into the wall socket.
- Type HI 105: Allow the iron to heat up for two minutes before you start
ironing.
If you set the temperature control to a lower setting after ironing at a high
temperature, allow the iron to cool down for five minutes before you
recommence ironing.
- Other types: When plugging in, the pilot light comes on (fig. 3).
When the pilot light has gone out and has come on again, you can start
ironing (fig. 4).
The pilot light will come on from time to time during ironing. This has no
effect on the ironing, so simply continue.
If you set the temperature control to a lower setting after ironing at a high
temperature, do not recommence ironing before the pilot light comes on
again.
Ironing tips
• Iron with a straight back. Adjust the height of the ironing board so that the
handle of the iron is on the same level as your elbow.
• Pressing onto the iron is not necessary, provided that the temperature
has been set correctly. Ironing is most effective if the laundry is slightly
damp.
When finished ironing
- Place the iron on its rear side (fig. 5).
- Set the temperature dial to position “MIN” (fig. 6).
- Remove the mains plug from the wall socket (fig. 7).
- Let the iron cool down for at least 30 minutes.
- You can wind up the mains cord (fig. 8) and then fix the cord end with the
cord clip (fig. 9).
- Store the iron standing on its rear side to prevent damage to the soleplate
(fig. 10).
Cleaning
- Before cleaning remove the mains plug from the wall socket and allow
the iron to cool down sufficiently.
- The appliance can be cleaned with a damp cloth.
English
Nederlands
Description générale (fig. 1)
A Thermostat (tourner)
B Semelle
C Témoin repère (type HI 105)
Témoin lumineux de température (autres types)
D Plaque signalétique
E Support
F Cordon
G Clip du cordon
Température de repassage
• Consultez toujours, avant de repasser, l'étiquette d'information cousue
dans la pièce à repasser. Suivez dans tous les cas les instructions de
repassage indiquées sur l'étiquette.
• Dans le cas ou vous n’avez pas d'instructions pour le repassage mais
vous connaissez la composition du tissu, alors sélectionnez :
1 ( température basse) pour les textiles synthetiques (acétate, acrylique,
viscose, polyamide, polyester) et également pour la soie.
2 (température moyenne ) pour la laine.
3 (température elevée) pour le coton et le lin.
• Ces instructions sont uniquement valables pour les tissus non travaillés.
Si le textile a subit une finition quelconque (plis, structure,relief…)
choisissez une température plus basse.
• Triez, avant de commencer le repassage, le linge selon la température
requise pour le repassage : laine avec laine, coton avec coton, etc.
• Le fer chauffe vite, mais refroidit plus lentement. C'est pourquoi il est
préférable de commencer par les tissus synthétiques qui doivent être
repassés à la température la plus basse. Ensuite, vous prenez les tissus
qui exigent une température plus élevée. Terminez le repassage avec le
coton et le lin.
• Au cas où le textile est composé de plusieurs types de fibres, prenez
toujours la température valable pour la matière la plus sensible.
(Par exemple: pour une pièce composée pour 60% de polyester et pour
40% de coton, réglez le fer à la température indiquée pour le
polyester (1).
• Si vous ne connaissez pas la composition du tissu, cherchez un endroit
qui n'est normalement pas visible et essayez à quelle température ce tissu
peut être repassé. (Commencez toujours par une température
relativement basse et passez ensuite à une température plus élevée
jusqu'à obtention du résultat souhaité.)
• Les velours et autres textiles qui risquent de lustrer sont toujours repassés
dans une seule direction (celle du poil) et sans appuyer sur le fer.
N'arrêtez pas le fer, mais laissez-le toujours en mouvement.
• Les matières synthétiques et la soie sont repassées de préférence du
côté intérieur pour éviter leur lustrage.
Réglage de la température
- Reglez la température a l'aide du thermostat (fig .2).
Positionnez la température choisie en face du témoin repère (modèle
HI 105) ou en face du témoin lumineux (autres modèles) (fig. 3).
- Branchez le fer.
- Type HI 105 : Laissez chauffer le fer pendant deux minutes avant de
commencer le repassage.
Si vous avez repassé à une température élevée et que vous réglez le fer
à une température plus basse, attendez cinq minutes avant de reprendre
le repassage pour faire refroidir le fer.
- Autres types : Lorsque vous branchez l'appareil, le témoin lumineux
s'allume. Une fois que le témoin lumineux s'est éteint puis rallumé, vous
pouvez commencer le repassage (fig. 4).
• Pendant le repassage, le témoin lumineux s'allumera de temps en temps.
Ceci n'a aucune influence sur le repassage : vous pouvez donc continuer
à repasser.
• Si vous avez repassé à une température élevée et réglé ensuite le fer à
une température plus basse, attendez que le témoin se soit rallumé avant
de reprendre le repassage.
Quelques conseils
• Assurez-vous de tenir le dos droit pendant le repassage. Installez votre
table à repasser de telle façon que la poignée du fer se trouve à la
hauteur de votre coude.
• Il n'est pas nécessaire d'appuyer sur le fer s'il est réglé à la bonne
température.
Vous obtiendrez les meilleurs résultats si le linge à repasser est
légèrement humide.
Après le repassage
- Placez le fer sur son support (fig. 5).
- Réglez le thermostat sur "MIN" (fig. 6).
- Débranchez l'appareil (fig. 7).
- Laissez le fer refroidir pendant au moins 30 minutes.
- Vous pouvez rouler le cordon autour du fer (fig. 8) puis le fixer avec le clip
(fig. 9).
- Rangez le fer toujours placé sur son support, pour éviter la détérioration
de la semelle (fig. 10).
Nettoyage
- Avant de nettoyer le fer, débranchez-le et laissez-le refroidir.
- Vous pouvez nettoyer le fer avec un chiffon humide.
Algemene beschrijving (fig. 1)
A Temperatuurregelaar (draaien)
B Zoolplaat
C Temperatuur markering (type HI 105)
Temperatuur markering / controlelampje (overige types)
D Typeplaatje
E Achterkant
F Snoer
G Snoerklem
Strijktemperatuur
• Kijk altijd eerst of er een etiket met strijkvoorschrift op het stuk textiel is
genaaid.
Volg in alle gevallen de aanwijzingen van het strijkvoorschrift op.
• Als het strijkvoorschrift ontbreekt maar u wel weet welke soort textiel het
betreft, kies dan:
1 (lage temperatuur) voor synthetische stoffen (bijv. acetaat, acryl,
viscose, polyamide, polyester) en zijde;
2 (matige temperatuur) voor wol;
3 (heet) voor katoen en linnen.
• Deze aanwijzingen gelden voor onbewerkte textielsoorten.
Als het textiel een bepaalde "finish" heeft gekregen (glans, kreuk,
structuur, reliëf), dan kunt u beter op een wat lagere temperatuur strijken.
• Sorteer het strijkgoed vooraf, rekening houdend met de strijktemperatuur:
wol bij wol, katoen bij katoen, enz.
• Het strijkijzer warmt snel op, maar koelt langzamer af. Daarom kunt u het
beste beginnen met de synthetische stoffen (kunststoffen), die op de
laagste temperatuur gestreken moeten worden. Schakel daarna over op
de hogere strijktemperaturen. Tenslotte strijkt u katoen en linnengoed.
• Wanneer het textiel uit verschillende vezelsoorten bestaat, kies dan altijd
de temperatuur die geldt voor de gevoeligste stof van deze
samenstelling.
(Bijvoorbeeld: als een stuk textiel bestaat uit "60% polyester en 40%
katoen", kies dan de temperatuur voor polyester (1).
• Als u niet weet uit welke vezelsoort(en) het textiel bestaat, zoek dan een
plek op die niet zichtbaar zal zijn als u het artikel draagt of gebruikt en
probeer daar uit welke temperatuur geschikt is. (Begin dan bij een
tamelijk lage temperatuur en schakel over op hogere temperatuur, totdat
het gewenste resultaat is bereikt.)
• Fluweel en andere weefsels die snel glimplekken vertonen, strijkt u altijd
in één richting (met de vleug mee) en zonder drukken.
Zorg dat het strijkijzer steeds in beweging blijft.
• Synthetische stoffen en zijde strijkt u bij voorkeur aan de binnenzijde om
glimplekken te voorkomen.
Temperatuur instellen
- Stel de aangegeven strijktemperatuur in met de temperatuur-regelaar
(fig. 2).
Draai de temperatuurregelaar zó dat de aanduiding van de gewenste
temperatuur op de regelaar tegenover de stip (HI 105) of het
controlelampje (overige types) op het strijkijzer komt te staan (fig. 3).
- Steek de stekker in het stopcontact.
- Type HI 105: Laat het strijkijzer twee minuten opwarmen voordat u begint
te strijken.
Als u met hoge temperatuur gestreken hebt en vervolgens de
temperatuurregelaar in een lagere stand zet, begin dan pas weer met
strijken nadat u het strijkijzer vijf minuten heeft laten afkoelen.
- overige Types: Wanneer u de stekker in het stopcontact steekt, gaat het
controlelampje branden (fig. 3).
- Als het controlelampje eerst is uitgegaan en daarna weer is gaan
branden, kunt u beginnen met strijken (fig. 4).
• Tijdens het strijken zal het controlelampje van tijd tot tijd even gaan
branden. Dit heeft geen invloed op het strijken: u kunt daar dus gewoon
mee doorgaan.
• Als u met hoge temperatuur gestreken hebt en vervolgens de
temperatuurregelaar in een lagere stand zet, begin dan pas weer met
strijken wanneer het controlelampje opnieuw gaat branden.
Strijktips
• Strijk met een rechte rug. Stel de hoogte van de strijkplank zo in, dat de
handgreep van het strijkijzer zich op dezelfde hoogte bevindt als uw
elleboog.
• Het is niet nodig hard op het strijkijzer te duwen, mits de temperatuur juist
is ingesteld.
Het effect is het grootst wanneer het strijkgoed enigszins vochtig is.
Wanneer u klaar bent met strijken
- Zet het strijkijzer op zijn achterkant (fig. 5).
- Zet de temperatuurregelaar in stand “MIN” (fig. 6).
- Trek de stekker uit het stopcontact (fig. 7).
- Laat het strijkijzer minstens 30 minuten afkoelen.
- U kunt het snoer opwikkelen (fig. 8) en daarna vastzetten met de
snoerklem (fig. 9).
- Berg het strijkijzer rechtopstaand op: dan is er het minste risico op
beschadiging van de zoolplaat (fig. 10).
Schoonmaken
- Haal vóór het schoonmaken de stekker uit het stopcontact en laat het
strijkijzer voldoende afkoelen.
- U kunt het strijkijzer schoonmaken met een vochtige doek.
;
Italiano
DESCRIZIONE GENERALE (fig. 1)
A Termostato (ruotare)
B Piastra
C Indicazione temperatura (modello HI105)
Indicazione temperatura/spia (altri modelli)
D Targhetta
E Parte posteriore
F Cavo di alimentazione
G Gancio per il cavo
Temperatura di stiratura
• Per prima cosa controllate se il capo da stirare è provvisto dell'apposita
etichetta con le istruzioni per la stiratura.
Attenetevi in ogni caso ai consigli riportati.
• Se le istruzioni mancano, ma voi conoscete il tipo di tessuto, selezionate:
1 (bassa temperatura) per tessuti sintetici (p.e. acetato, acrilico, viscosa,
poliammide, poliestere) e per la seta;
2 (media temperatura) per lana;
3 (caldo) per cotone e lino.
• La tabella è valida solo per le fibre tessili. In caso di applicazioni (lustrini,
crespature, parti in rilievo ecc.) vi consigliamo di utilizzare temperature più
basse.
• Dividete per prima cosa i capi da stirare in base alle diverse temperature
di stiratura: lana con lana, cotone con cotone ecc.
• Il ferro impiega meno tempo a riscaldarsi che a raffreddarsi, quindi vi
consigliamo di iniziare a stirare i capi che richiedono le temperature più
basse, come i capi in fibra sintetica. Passate poi progressivamente alle
temperature più alte.
• Se il capo è composto da tessuti diversi, scegliete sempre la temperatura
più bassa (es.: un capo composto per il 60% da poliestere e per il 40% da
cotone, dovrà essere stirato alla temperatura indicata per il poliestere (1).
Se non conoscete la composizione del tessuto, effettuate una prova su un
angolo nascosto del capo per stabilire la giusta temperatura (iniziate da
quella più bassa e aumentatela gradatamente fino a raggiungere quella
che fornisce i risultati desiderati).
• Il velluto e gli altri tessuti che tendono a diventare lucidi rapidamente
devono essere stirati in una sola direzione (nel senso del pelo),
esercitando una leggerissima pressione.
Non tenete mai fermo il ferro sullo stesso punto.
• Per evitare tracce di lucido, stirate al rovescio i capi in materiale sintetico e
in seta.
Come impostare la temperatura di stiratura
- La temperatura del ferro viene regolata per mezzo dell'apposito disco
(fig. 2).
Ruotate il disco sino a quando il valore desiderato di temperatura
coincide con il puntino (mod. HI 105) o con la spia (altri modelli) presenti
sul ferro (fig. 3).
- Inserite la spina nella presa di corrente.
- Modello HI 105: Lasciate riscaldare il ferro per due minuti prima di usarlo.
Se, dopo aver stirato a temperatura elevata, desiderate abbassare la
temperatura è opportuno lasciar raffreddare il ferro per 5 minuti prima di
riprendere la stiratura.
- Altri modelli: Quando inserite la spina nella presa la spia si accende
(fig. 4).
Prima di cominciare a stirare è necessario attendere che la spia si spenga
e si riaccenda nuovame,nte.
Durante la stiratura è normale che la spia si accenda di tanto in tanto;
quando ciò accade, potete tranquillamente continuare a stirare.
- Se, dopo aver stirato a temperatura elevata, regolate la temperatura su un
valore più basso, aspettate che la spia si riaccenda prima di riprendere a
stirare.
Consigli per una migliore stiratura
• Stirate sempre con la schiena ben diritta. Regolate l'altezza dell'asse del
stiro i modo che il manico del ferro da stiro sia all'altezza del vostro
gomito.
• Non è necessario esercitare una forte pressione sul tessuto da stirare, a
condizione che sia stata impostata la temperatura esatta. Ricordate che i
panni leggermente umidi sono più facili da stirare.
Al termine della stiratura
- Appoggiate il ferro sulla parte posteriore (fig. 5).
- Impostate il termostato sulla posizione "MIN" (fig. 6).
- Togliete la spina dalla presa di corrente (fig. 7).
- Lasciate raffreddare il ferro per almeno 30 minuti.
- Potete avvolgere il cavo (fig. 8) e quindi fissarlo all'apposito gancio
(fig. 9).
- Riponete il ferro appoggiato sulla parte posteriore per evitare di
danneggiare la piastra (fig. 10).
Pulizia
- Prima di pulire il ferro, togliete la spina dalla presa di corrente e aspettate
che l'apparecchio sia freddo.
- Il ferro può essere pulito con un panno umido.
Important
• Please read these instructions for use carefully in conjunction
with the illustrations before using the appliance.
• Before using for the first time, check if the voltage rating on the
typeplate corresponds to the mains voltage in your home.
• Never use the appliance if damaged in any way.
• Take care that children cannot touch the iron when hot and that
they cannot pull the mains cord.
• The cordset should not be allowed to touch the soleplate when it
is hot.
• Never immerse the iron in water.
• Always place the iron with its back on a firm flat surface when
interrupting ironing and after use. When leaving, even when only
for a short while, always unplug the iron.
• Keep the soleplate smooth: avoid hard contact with metal
objects.
• Some parts of the iron have been slightly greased and as a
result the iron might slightly smoke when connected for the first
time. After a short while, however, this will cease.
• Do not leave the iron unattended while it is connected to the
mains supply.
• If the mains cord of this appliance is damaged, it must be
replaced by the original type only.
Please apply to your Philips dealer or to the Philips organisation
in your country for replacement.
Important
• Lisez le mode d'emploi et étudiez les illustrations avant la mise
en service de l'appareil.
• Assurez-vous, avant de brancher l'appareil, que le voltage
indiqué sur la plaque signalétique corresponde au voltage du
réseau de votre habitation.
• N'utilisez jamais l'appareil en cas de défection d'un de ses
éléments.
• Tenez le fer chaud ainsi que le cordon hors de la portée des
enfants.
• Veillez à ce que le cordon ne soit jamais en contact avec la
semelle.
• N'immergez jamais le fer dans l'eau.
• Lorsque vous avez terminé le repassage ou que vous
l'interrompez, placez le fer sur son support et sur une surface
stable et plane. Débranchez toujours l'appareil lorsque vous
vous absentez pendant le repassage, même momentanément.
• Veillez à ce que la semelle reste bien lisse : assurez-vous qu'elle
n'entre pas en contact avec des objets en métal.
• Certaines parties du fer sont légèrement graissées. De ce fait, le
fer peut dégager de la fumée pendant la première mise en
service. Au bout de quelque temps, cette fumée, qui est sans
aucun danger, disparaîtra.
• Ne laissez pas le fer sans surveillance lorsqu'il est branché.
• Le cordon d'alimentation ne peut être remplacé que par un
modèle de même type. Adressez-vous à votre revendeur Philips
ou à l'une des stations techniques agréées Philips de votre pays.
Belangrijk
• Lees de gebruiksaanwijzing en bekijk alle plaatjes goed voordat
u het apparaat in gebruik neemt.
• Controleer, voordat u het apparaat in gebruik neemt, of de
aanduiding van het voltage op het typeplaatje overeenkomt met
de netspanning in uw woning.
• Gebruik uw strijkijzer nooit als er iets stuk aan is.
• Zorg ervoor dat kinderen niet aan het hete strijkijzer kunnen
komen, en dat zij niet aan het snoer kunnen trekken.
• Zorg ervoor dat het snoer niet in aanraking kan komen met de
zoolplaat wanneer deze heet is.
• Dompel het strijkijzer nooit in water.
• Zet het strijkijzer met zijn achterkant op een stevig, vlak blad als
u even ophoudt met strijken en wanneer u klaar bent. Als u weg
moet tijdens het strijken, zelfs wanneer het maar voor korte tijd
is, haal dan altijd de stekker uit het stopcontact.
• Houd de zoolplaat mooi glad: zorg ervoor dat deze niet hard in
aanraking komt met metalen voorwerpen.
• Enkele onderdelen van het strijkijzer zijn licht ingevet. Daardoor
kan er wat rook van het strijkijzer komen als u het voor de eerste
keer gebruikt. Na korte tijd houdt dit (onschuldige) verschijnsel
vanzelf op.
• Blijf bij het apparaat in de buurt wanneer het is aangesloten.
• Indien het snoer van dit apparaat is beschadigd, dient het
uitsluitend door het originele type te worden vervangen. Wend u
daartoe tot uw Philips leverancier of tot de Philips organisatie in
uw land.
IMPORTANTE
• Prima di usare l'apparecchio, leggete con attenzione le istruzioni
e osservate le figure.
• Prima di usare il ferro per la prima volta, controllate che la
tensione indicata sulla targhetta corrisponda a quella della rete
locale.
• Non utilizzate l'apparecchio nel caso risultasse danneggiato in
qualsiasi modo.
• Tenete i bambini lontani dal ferro caldo e fate in modo che non
possano tirare il cavo di alimentazione.
• Il cavo non deve mai toccare la piastra quando è calda.
• Non immergete mai il ferro nell'acqua.
• Appoggiate sempre il ferro su una superficie piana e stabile
quando dovete allontanarvi anche solo per un attimo e quando
avete finito di stirare. Staccate sempre la spina anche nel caso di
una breve interruzione.
• Maneggiate con cura la piastra ed evitate di scalfirla con oggetti
metallici.
• Alcune parti del ferro sono state leggermente lubrificate e quindi
può verificarsi la fuoriuscita di fumo la prima volta che lo
userete. Tale fenomeno scomparirà comunque spontaneamente.
• Non lasciata mai il ferro incustodito mentre è collegato ad una
presa elettrica.
• Se il cavo di alimentazione di questo apparecchio si dovesse
rovinare, occorrerà sostituirlo con un cavo speciale: a questo
scopo rivolgetevi al Vostro rivenditore Philips o ad uno dei
Centri Assistenza Philips del Vostro Paese.


Λάβετε μέρος στη συζήτηση σχετικά με αυτό το προϊόν
Εδώ μπορείτε να μοιραστείτε τη γνώμη σας για το Philips HI114 Σίδερο. Εάν έχετε κάποια ερώτηση, διαβάστε πρώτα προσεκτικά το εγχειρίδιο. Το να ζητήσετε ένα εγχειρίδιο μπορεί να γίνει χρησιμοποιώντας τη φόρμα επικοινωνίας μας.