
ENGLISH
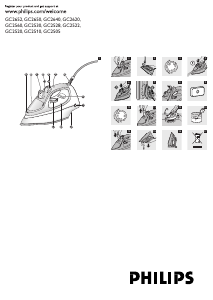
General description (Fig. 1)
A Spray nozzle
B Capofllingopening
C Steam control
O = no steam
l =minimumsteam
; =maximumsteam
1=Calc-Cleanfunction
D Shot-of-steambutton9
E SpraybuttonT
F Automaticshut-offlight(GC2560only)
G Mainscord
H Anti-Calctablet(alltypesexceptGC2522,GC2510
andGC2505)
I Temperaturelight
J Type plate
K Water tank
L Temperaturedial
Important
Readtheseinstructionsforusecarefullybeforeusingthe
applianceandsavethemforfuturereference.
Check if the voltage indicated on the type plate
corresponds to the local mains voltage before you
connect the appliance.
Only connect the appliance to an earthed wall
socket.
Do not use the appliance if the plug, the cord or
the appliance itself shows visible damage, or if the
appliance has been dropped or is leaking.
Check the cord regularly for possible damage.
If the mains cord is damaged, it must be replaced
by Philips, a service centre authorised by Philips
or similarly qualied persons in order to avoid a
hazard.
Never leave the appliance unattended when it is
connected to the mains.
Never immerse the iron and the stand, if provided,
in water.
This appliance is not intended for use by persons
(including children) with reduced physical, sensory
or mental capabilities, or lack of experience and
knowledge, unless they have been given supervision
or instruction concerning use of the appliance by a
person responsible for their safety.
Children should be supervised to ensure that they
do not play with the appliance.
The soleplate of the iron can become extremely
hot and may cause burns if touched.
Do not allow the cord to come into contact with
the soleplate when it is hot.
When you have nished ironing, when you clean
the appliance, when you ll or empty the water
tank and also when you leave the iron even for a
short while: set the steam control to position O,
put the iron on its heel and remove the mains plug
from the wall socket.
Always place and use the iron and the stand, if
provided, on a stable, level and horizontal surface.
This appliance is intended for household use only.
ThisPhilipsappliancecomplieswithallstandards
regardingelectromagneticelds(EMF).Ifhandled
properlyandinaccordancewiththeinstructionsinthis
instructionmanual,theapplianceissafetouseaccording
toscienticevidenceavailabletoday.
Preparing for use
Filling the water tank
1 Remove the mains plug from the wall socket.
2 Set the steam control to position O (= no
steam) (Fig. 2).
3 Open the cap of the lling opening.
4 Tilt the iron and ll the water tank up to maximum
level (Fig. 3).
If the tap water in your area is very hard, we advise you
to use distilled water.
Do not use chemically descaled water.
Do not ll the water tank beyond the MAX indication.
-
-
-
-
,
,
,
,
,
,
,
,
,
,
,
,
,
,
Do not put perfume, vinegar, starch, descaling agents,
ironing aids or other chemicals in the water tank.
5 Close the cap of the lling opening (‘click’).
Setting the temperature
The iron may give off some smoke when you use it
for the rst time. This will cease after a short while.
1 Put the iron on its heel and set the temperature
dial to the required ironing temperature by turning
it to the appropriate position (Fig. 4).
Checkthelaundrycarelabelfortherequiredironing
temperature.
1 Syntheticfabrics(e.g.acrylic,viscose,
polyamide,polyester)
1 Silk
2 Wool
3Cotton,linen
Ifyoudonotknowwhatkindorkindsoffabric
anarticleismadeof,determinetherightironing
temperaturebyironingapartthatwillnotbevisible
whenyouwearorusethearticle.
Silk,woollenandsyntheticmaterials:ironthereverse
sideofthefabrictopreventshinypatches.Avoid
usingthesprayfunctiontopreventstains.
2 Put the mains plug in an earthed wall socket.
3 When the temperature light has gone out, wait a
while before you start ironing.
Note: The temperature light will go on from time to time
during ironing.
Using the appliance
Steam ironing
Makesurethatthereisenoughwaterinthewatertank.
1 Set the temperature dial to the recommended
position (see section ‘Setting the temperature’).
2 Set the steam control to the appropriate steam
position (Fig. 2).
çforminimumsteam(temperaturesettings2and
3).
éformaximumsteam(temperaturesettings3
toMAX).
Note: The iron will start steaming as soon as the set
temperature has been reached.
GC2640/GC2620/GC2530/GC2528/
GC2520/GC2510/GC2505 only:
Watermayleakfromthesoleplateifthesettemperature
istoolow(MINto2).
Ironing without steam
1 Set the steam control to position O (= no steam).
2 Set the temperature dial to the recommended
position (see section ‘Setting the temperature’).
Features
Spray function
Youcanusethesprayfunctiontoremovestubborn
creasesatanytemperature
1 Make sure that there is enough water in the water
tank.
2 Press the spray button several times to moisten the
article to be ironed (Fig. 5).
Shot of steam
Apowerfulshotofsteamhelpstoremoveverystubborn
creases.
Theshot-of-steamfunctiononlyworksattemperature
settingsbetween
2andMAX.
1 Press and release the shot-of-steam button (Fig. 6).
Vertical shot of steam (all types except
GC2510 and GC2505)
1 The shot-of-steam function can also be used when
you are holding the iron in vertical position. This is
useful for removing creases from hanging clothes,
curtains, etc (Fig. 7).
Never direct the steam at people.
,
-
-
-
-
-
-
-
-
-
Drip stop (GC2652/GC2650/GC2560/
GC2522 only)
Thisironisequippedwithadripstopfunction:the
ironautomaticallystopsproducingsteamwhenthe
temperatureistoolowtopreventwaterfromdripping
outofthesoleplate.Whenthishappensyouwillheara
click.
Automatic shut-off (GC2560 only)
Theelectronicshut-offfunctionautomaticallyswitches
theheatingelementoffiftheironhasnotbeenmoved
forawhile.
The automatic shut-off light starts blinking to
indicate that the heating element has been switched
off (Fig. 8).
Tolettheironheatupagain,picktheironupormoveit
slightly.Theautomaticshut-offlightgoesout.
1 If the temperature light goes on, wait for it to go
out before you start ironing.
2 If the temperature light does not go on, the iron is
ready for use.
Cleaning and maintenance
Double-Active Calc System
All types except GC2510: The Anti-Calc tablet
prevents scale from clogging the steam vents. The
tablet is constantly active and does not need to be
replaced (Fig. 9).
The Calc-Clean function removes the scale
particles.
Calc-Clean function
UsetheCalc-Cleanfunctiononceeverytwoweeks.Ifthe
waterinyourareaisveryhard(i.e.whenakescomeout
ofthesoleplateduringironing),theCalc-Cleanfunction
shouldbeusedmorefrequently.
1 Set the steam control to position O.
2 Fill the water tank to the maximum level.
Do not pour vinegar or other descaling agents into the
water tank.
3 Set the temperature dial to MAX (Fig. 10).
4 Put the plug in the wall socket.
5 Unplug the iron when the temperature light has
gone out.
6 Hold the iron over the sink and set the steam
control to the Calc-Clean position (1). The steam
control will spring up slightly.
7 Pull the steam control upwards and remove
it (Fig. 11).
8 Hold the iron over the sink and move it to and
fro (Fig. 12).
Note: Steam and boiling water will come out of the soleplate.
Impurities and scale (if any) will be ushed out.
9 Use vinegar to remove scale, if any, from the steam
control needle (Fig. 13).
Do not bend or damage the steam control needle.
10 Put the steam control back into the iron by
inserting the point of the needle exactly in
the centre of the hole and by tting the small
projection on the side of the needle into the slot.
Press down the steam control while turning it to
position O (Fig. 14).
11 Repeat the Calc-Clean process if the iron still
contains a lot of impurities.
After the Calc-Clean process
1 Put the plug in the wall socket and let the iron heat
up to allow the soleplate to dry.
2 Unplug the iron when the temperature light has
gone out.
3 Move the iron gently over a piece of used cloth to
remove any water stains that may have formed on
the soleplate.
Storage
1 Set the steam control to position O, remove the
plug from the wall socket and let the iron cool
down.
,
,
,


Λάβετε μέρος στη συζήτηση σχετικά με αυτό το προϊόν
Εδώ μπορείτε να μοιραστείτε τη γνώμη σας για το Philips GC2522 Σίδερο. Εάν έχετε κάποια ερώτηση, διαβάστε πρώτα προσεκτικά το εγχειρίδιο. Το να ζητήσετε ένα εγχειρίδιο μπορεί να γίνει χρησιμοποιώντας τη φόρμα επικοινωνίας μας.