POWER JACK
AUX
REPEA
T
T
U-
TU+
CH-
PRG
SKIP+
SKIP+
PL
A
Y/
PA
U
S
E
STO
P
RAD
IO AUTO
CH+
MIN
V
O
LUME
OPEN/
CLOSE
MAX
SOURCE
SOURCE
14 15
4
1
3
13 12 11 6710 89
2
3
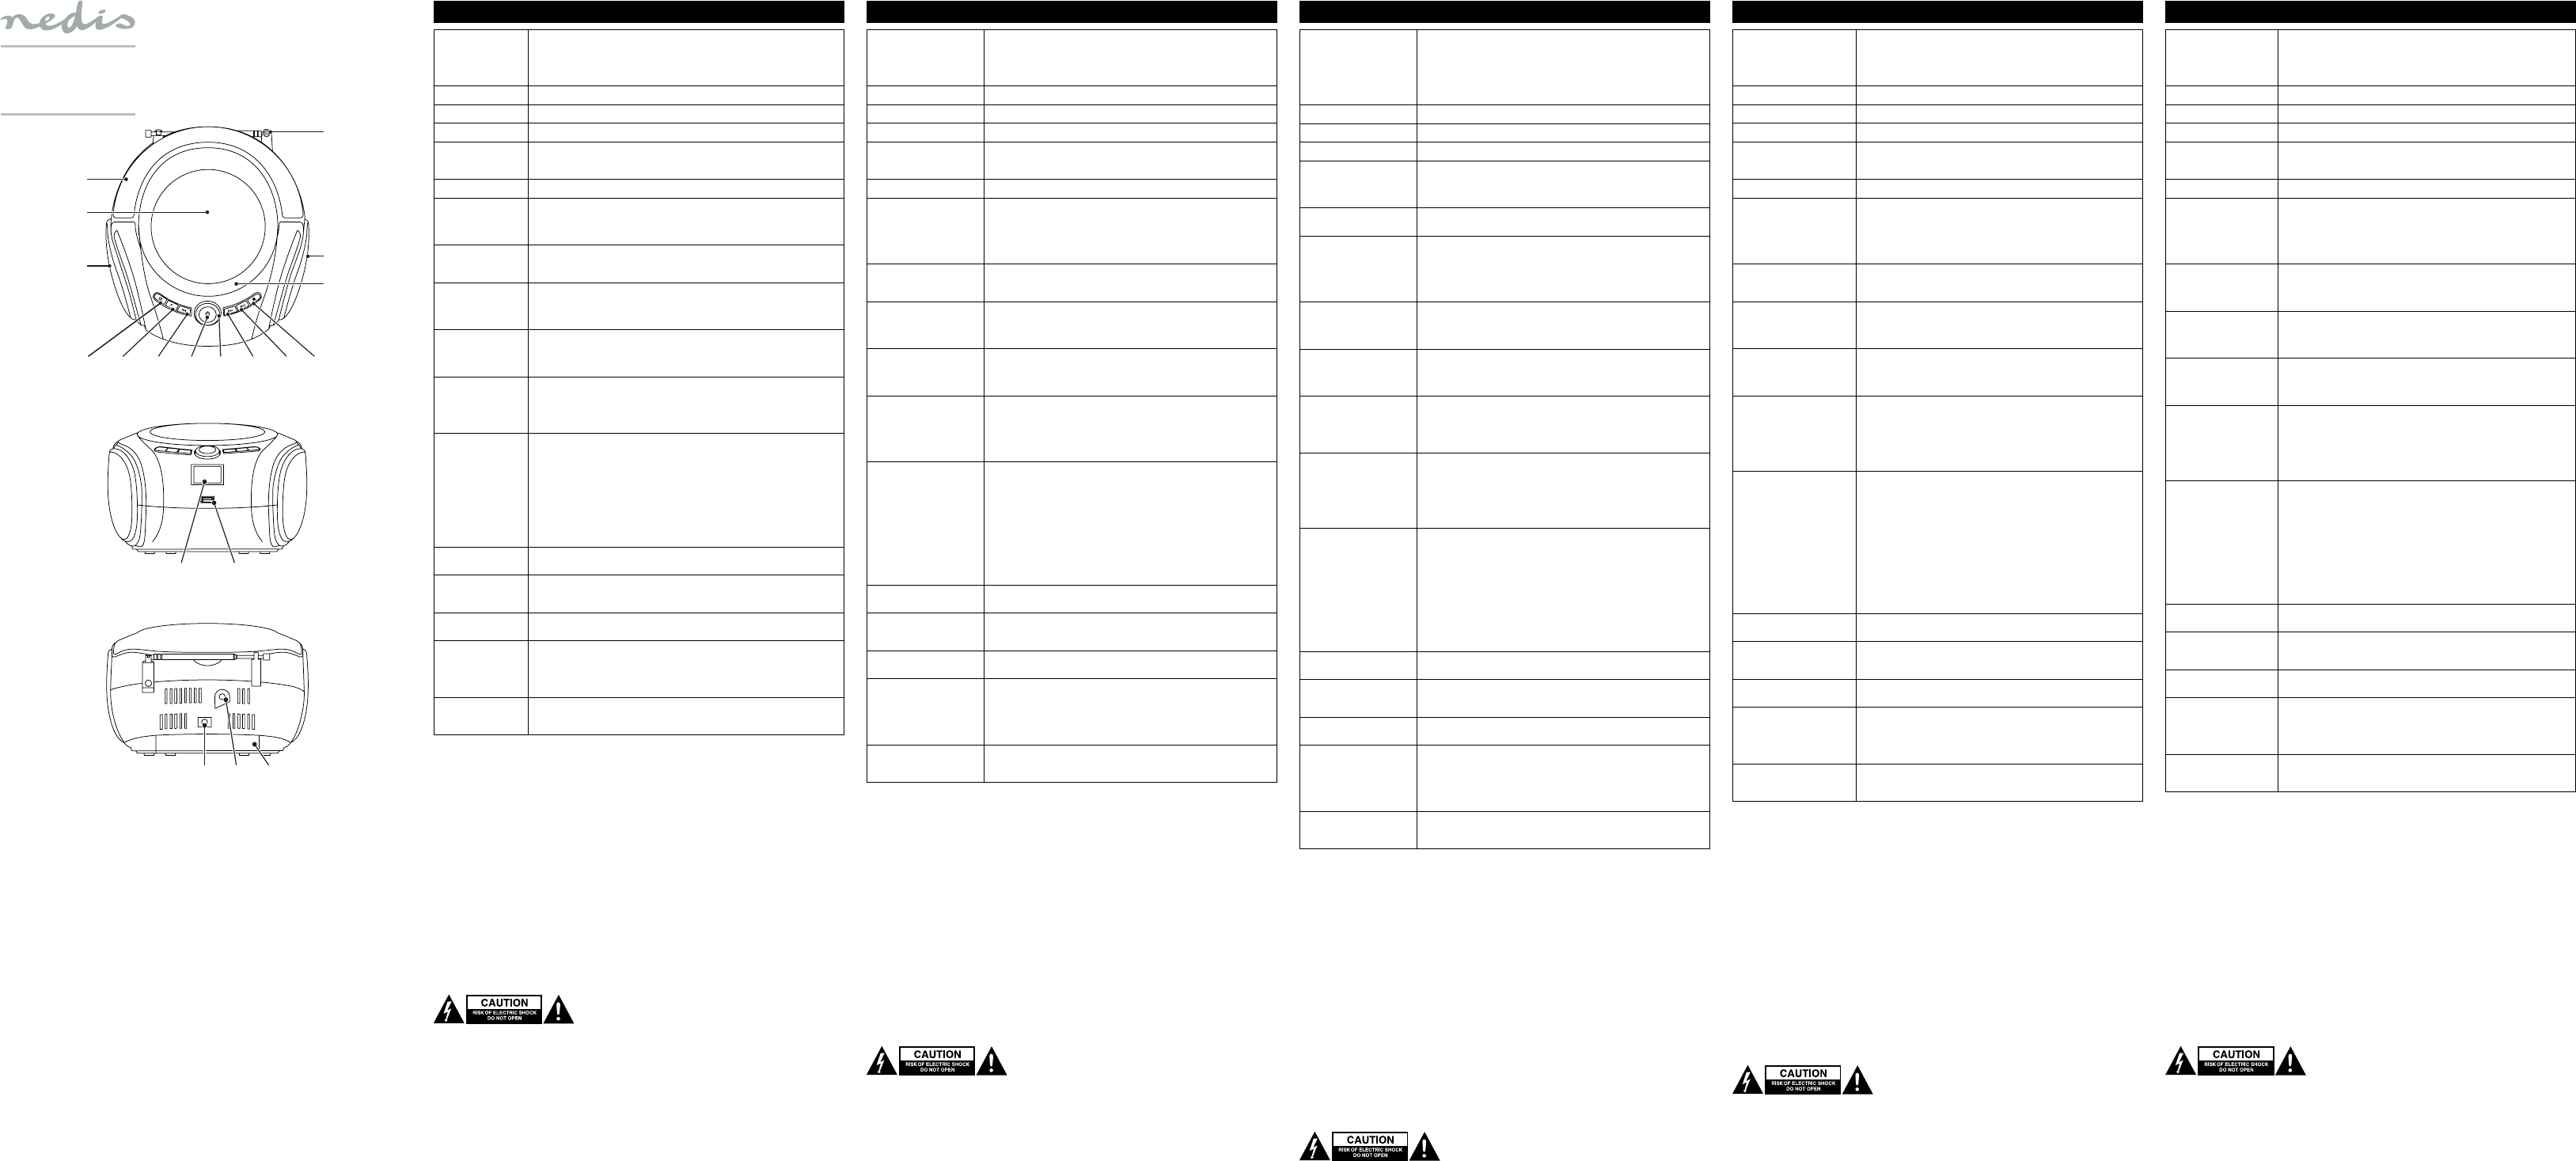
English - Description
1. CD compartment
2. Open/close button
The device can play CD/CD-R/CD-RW/MP3/WMA discs. The device cannot play discs
encoded with copyright protection technologies.
• Press the open/close button to open the cover.
• Put the CD disc into the CD compartment.
• Close the cover. The device starts to play the CD automatically.
3. Speaker
4. Handle
5. FM antenna
6. On/o button
Source button
• Press and hold the button to switch on or o the device.
• If the device is switched on, press the button to change the source:
CD/USB/AUX/Bluetooth/FM.
7. Volume dial • Turn the volume dial to increase or decrease the volume.
8. Play/pause button
Automatic channel
scanning button
(FM)
• CD/USB/AUX/Bluetooth mode: Press the button to play or pause the track.
• FM mode: Press the button to enter automatic channel scanning mode. The device will
scan the FM stereo stations and the memory automatically. The device will stop after
reaching the maximum number of memory station (max. 20 radio stations).
9. Stop button
Memory button
(FM)
• CD/USB/AUX/Bluetooth mode: Press the button to stop the track.
• FM mode: Press the button to enter FM memory mode (max. 20 radio stations).
10. Channel + button
Fast-forward button
Skip-forward
button
• FM mode: Press the button to select the next radio station.
• CD/USB/AUX/Bluetooth mode: Press and hold the button to fast-forward the current track.
• CD/USB/AUX mode: Press the button to select the next track.
11. Channel - button
Rewind button
Skip-backward
button
• FM mode: Press the button to select the previous radio station.
• CD/USB/AUX/Bluetooth mode: Press and hold the button to rewind the current track.
• CD/USB/AUX mode: Press the button to select the previous track.
12. Tuner up button
Repeat button
• FM mode: Repeatedly press the button to ne-tune the radio frequency by +0.1MHz.
Press and hold the button to enter automatic channel scanning mode. The device will
stop at the next FM stereo station.
• CD/MP3/USB mode: Repeatedly press the button to select the playback mode: normal
playback / repeat the current track / repeat the current folder / repeat all tracks.
13. Tuner down button
Programming
button
• FM mode: Repeatedly press the button to ne-tune the radio frequency by -0.1MHz.
Press and hold the button to enter automatic channel scan mode. The device will stop at
the next FM stereo station.
• CD/MP3/USB mode: Press the button to enter the programming mode. "PRG" and "P01"
ash on the display.
- To create a playlist: Select the tracks using the skip-forward button and the skip-
backward button. Press the button to save the tracks (CD: max. 20 tracks / MP3: max. 99
tracks). Press the play/pause button to play the pogrammed tracks starting from the rst
track.
- To delete a playlist: While the playlist is playing, press the stop button twice and open
the CD compartment.
14. Display • CD/MP3/USB mode: The display shows the number of tracks.
• FM mode: The display shows the digital FM frequency.
15. USB input The device can play MP3/WMA les from USB devices.
• Connect a USB device to the USB input. The device automatically starts to play the tracks
from the USB device (max. 32GB).
16. DC input • Connect the power adapter to the DC input.
• Insert the mains plug of the power adapter into the wall socket.
17. AUX input The device can play CD/MP3 tracks from audio devices (only if there is no disc in the CD
compartment).
• Connect an AUX cable to the AUX input of the device and the audio device.
• Press the source button to select Bluetooth. The device automatically starts to play the
tracks from the audio device.
18. Battery
compartment
• Open the battery compartment.
• Insert the batteries (4x 1.5V R14/UM-2/C) into the battery compartment.
• Close the battery compartment.
Bluetooth pairing
The distance between the devices to be paired must be less than 1 meter.
• Press the source button to select Bluetooth. The Bluetooth function starts scanning.
• Select the mobile phone Bluetooth scanning.
• Select "SPBB100" in the Bluetooth device list to start the pairing process.
Note: If the Bluetooth device requires a password, enter "0000".
• If the pairing is completed successfully, the device is in playback mode.
Safety
General safety
• Read the manual carefully before use. Keep the manual for future reference.
• The manufacturer is not liable for consequential damages or for damages to property or persons caused by non-
observance of the safety instructions and improper use of the device.
• Only use the device for its intended purposes. Do not use the device for other purposes than described in the manual.
• Do not use the device if any part is damaged or defective. If the device is damaged or defective, replace the device
immediately.
• The device is suitable for indoor use only. Do not use the device outdoors.
• The device is suitable for domestic use only. Do not use the device for commercial purposes.
• Do not use the device in locations with high humidity, such as bathrooms and swimming pools.
• Do not use the device near bathtubs, showers, basins or other vessels containing water.
• Do not use a timer or a separate remote-control system that switches on the device automatically.
• Do not cover the device.
• Place the device on a stable, at surface.
• Keep the device away from ammable objects.
Electrical safety
• To reduce risk of electric shock, this product should only be opened by an authorized technician when service is required.
• Disconnect the product from the mains and other equipment if a problem should occur.
• Do not use the device if the mains cable or mains plug is damaged or defective. If the mains cable or mains plug is
damaged or defective, it must be replaced by the manufacturer or an authorised repair agent.
• Before use, always check that the mains voltage is the same as the voltage on the rating plate of the device.
• Do not move the device by pulling the mains cable. Make sure that the mains cable cannot become entangled.
• Do not immerse the device, the mains cable or the mains plug in water or other liquids.
• Do not leave the device unattended while the mains plug is connected to the mains supply.
• Do not use an extension cable.
Cleaning and maintenance
Warning!
• Before cleaning or maintenance, always switch o the device, remove the mains plug from the wall socket and wait until
the device has cooled down.
• Do not use cleaning solvents or abrasives.
• Do not clean the inside of the device.
• Do not attempt to repair the device. If the device does not operate correctly, replace it with a new device.
• Do not immerse the device in water or other liquids.
• Clean the outside of the device using a soft, damp cloth. Thoroughly dry the device with a clean, dry cloth.
• Clean the ventilation openings using a soft brush.
Support
If you need further help or have comments or suggestions, please visit www.nedis.com/support
SPBB100xx
Portable CD/MP3/USB/Bluetooth/radio player
Nederlands - Beschrijving
1. CD-compartiment
2. Openen/sluiten-knop
Het apparaat kan CD/CD-R/CD-RW/MP3/WMA-schijven afspelen. Het apparaat kan
geen schijven afspelen die zijn gecodeerd met copyrightbeveiligingstechnologieën.
• Druk op openen/sluiten-knop om het deksel te openen.
• Plaats de CD-schijf in het CD-compartiment.
• Sluit het deksel. Het apparaat begint de CD automatisch af te spelen.
3. Speaker
4. Greep
5. FM-antenne
6. Aan/uit-knop
Bronknop
• Houd de knop ingedrukt om het apparaat in of uit te schakelen.
• Druk, indien het apparaat is ingeschakeld, op de knop om de bron te veranderen:
CD/USB/AUX/Bluetooth/FM.
7. Volumeknop • Draai de volumeknop om het volume te verhogen of te verlagen.
8. Afspelen/pauzeren-knop
Knop voor het automatisch
zoeken naar kanalen (FM)
• CD/USB/AUX/Bluetooth modus: Druk op de knop om het nummer af te spelen
of tijdelijk te stoppen.
• FM-modus: Druk op de knop om de modus voor het automatisch zoeken naar
kanalen te activeren. Het apparaat scant automatisch de FM-stereozenders en
het geheugen. Het apparaat stopt nadat het maximale aantal zenders in het
geheugen is bereikt (max. 20 radiozenders).
9. Stopknop
Geheugenknop (FM)
• CD/USB/AUX/Bluetooth modus: Druk op de knop om het nummer te stoppen.
• FM-modus: Druk op de knop om de FM-geheugenmodus te activeren (max. 20
radiozenders).
10. Kanaal + knop
Knop voor snel
vooruitspoelen
Knop voor vooruitspringen
• FM-modus: Druk op de knop om de volgende radiozender te selecteren.
• CD/USB/AUX/Bluetooth modus: Houd de knop ingedrukt om het huidige
nummer snel vooruit te spoelen.
• CD/USB/AUX modus: Druk op de knop om het volgende nummer te selecteren.
11. Kanaalknop - knop
Knop voor terugspoelen
Knop voor terugspringen
• FM-modus: Druk op de knop om de vorige radiozender te selecteren.
• CD/USB/AUX/Bluetooth modus: Houd de knop ingedrukt om het huidige
nummer terug te spoelen.
• CD/USB/AUX modus: Druk op de knop om het vorige nummer te selecteren.
12. Knop voor tuner omhoog
Herhalen-knop
• FM-modus: Druk herhaaldelijk op de knop om de radiofrequentie te verjnen met
+ 0,1 MHz. Houd de knop ingedrukt om de modus voor het automatisch zoeken
naar kanalen te activeren. Het apparaat stopt bij de volgende FM-stereozender.
• CD/MP3/USB modus: Druk herhaaldelijk op de knop om de afspeelmodus te
selecteren: normaal afspelen/het huidige nummer herhalen/de huidige map
herhalen/alle nummers herhalen.
13. Knop voor tuner omlaag
Programmeer-knop
• FM-modus: Druk herhaaldelijk op de knop om de radiofrequentie te verjnen met -
0,1 MHz. Houd de knop ingedrukt om de modus voor het automatisch zoeken naar
kanalen te activeren. Het apparaat stopt bij de volgende FM-stereozender.
• CD/MP3/USB modus: Druk op de knop om de programmeermodus te activeren.
“PRG" en "P01" knipperen op de display.
- Een afspeellijst maken: Selecteer de nummers met de knop voor
vooruitspringen en de knop voor terugspringen. Druk op de knop om de
nummers op te slaan (CD: max. 20 nummers/MP3: max. 99 nummers). Druk op de
afspelen/pauzeren-knop om de geprogrammeerde nummers af te spelen vanaf
het eerste nummer.
- Een afspeellijst wissen: Druk terwijl de afspeellijst wordt afgespeeld tweemaal
op de stopknop en open het CD-compartiment.
14. Display • CD/MP3/USB modus: De display toont het aantal nummers.
• FM-modus: De display toont de digitale FM-frequentie.
15. USB-ingang Het apparaat kan MP3/WMA-bestanden van USB-apparaten afspelen.
• Sluit een audio-apparaat aan op de USB-ingang. Het apparaat begint
automatisch de nummers van het USB-apparaat af te spelen (max. 32 GB).
16. DC-ingang • Sluit de stroomadapter aan op de DC-ingang.
• Plaats de netstekker van de stroomadapter in het stopcontact.
17. AUX-ingang Het apparaat kan CD/MP3-nummers van audio-apparaten afspelen (alleen als er geen
CD in het CD-compartiment zit).
• Sluit een AUX-kabel op de AUX-ingangspoort van het apparaat en het audio-
apparaat aan.
• Druk op de bronknop om Bluetooth te selecteren. Het apparaat begint
automatisch de nummers van het audio-apparaat af te spelen.
18. Batterijcompartiment • Open het batterijcompartiment.
• Plaats de batterijen (4x 1,5 V R14/UM-2/C) in het batterijcompartiment.
• Sluit het batterijcompartiment.
Bluetooth koppelen
De afstand tussen de apparaten die met elkaar moeten worden gekoppeld, moet minder dan 1 meter zijn.
• Druk op de bronknop om Bluetooth te selecteren. De Bluetooth-functie begint met scannen.
• Selecteer de Bluetooth-scanfunctie van de mobiele telefoon.
• Selecteer "SPBB100" in de Bluetooth-apparatenlijst om het koppelingsproces te starten.
Opmerking: Als het Bluetooth-apparaat een wachtwoord vereist, voert u "0000" in.
• Na succesvolle voltooiing van de koppeling bevindt het apparaat zich in afspeelmodus.
Veiligheid
Algemene veiligheid
• Lees voor gebruik de handleiding zorgvuldig door. Bewaar de handleiding voor latere raadpleging.
• De fabrikant is niet aansprakelijk voor gevolgschade of voor schade aan eigendommen of personen veroorzaakt door
het niet naleven van de veiligheidsinstructies en door verkeerd gebruik van het apparaat.
• Gebruik het apparaat uitsluitend voor de beoogde doeleinden. Gebruik het apparaat niet voor andere doeleinden dan
beschreven in de handleiding.
• Gebruik het apparaat niet als een onderdeel beschadigd of defect is. Vervang een beschadigd of defect apparaat
onmiddellijk.
• Het apparaat is uitsluitend geschikt voor gebruik binnenshuis. Gebruik het apparaat niet buitenshuis.
• Het apparaat is uitsluitend geschikt voor huishoudelijk gebruik. Gebruik het apparaat niet voor commerciële doeleinden.
• Gebruik het apparaat niet op plaatsen met een hoge luchtvochtigheid, zoals badkamers en zwembaden.
• Gebruik het apparaat niet in de buurt van badkuipen, douches, wastafels of andere voorzieningen die water bevatten.
• Gebruik geen timer of afzonderlijk afstandsbedieningssysteem om het apparaat automatisch uit te schakelen.
• Bedek het apparaat niet.
• Plaats het apparaat op een stabiele, vlakke ondergrond.
• Houd het apparaat uit de buurt van brandbare objecten.
Elektrische veiligheid
• Dit product mag voor onderhoud uitsluitend door een erkende technicus worden geopend om het risico op elektrische
schokken te verkleinen.
• Koppel het product los van het stopcontact en van andere apparatuur als zich problemen voordoen.
• Gebruik het apparaat niet als het netsnoer of de netstekker beschadigd of defect is. Indien het netsnoer of de netstekker
beschadigd of defect is, moet het onderdeel door de fabrikant of een erkend servicecentrum worden vervangen.
• Controleer voor gebruik altijd of de netspanning overeenkomt met de spanning op het typeplaatje van het apparaat.
• Verplaats het apparaat niet door aan het netsnoer te trekken. Zorg dat het netsnoer niet in de war kan raken.
• Dompel het apparaat, het netsnoer of de netstekker niet onder in water of andere vloeistoen.
• Laat het apparaat niet onbeheerd achter terwijl de netstekker op de netvoeding is aangesloten.
• Gebruik geen verlengsnoer.
Reiniging en onderhoud
Waarschuwing!
• Schakel voor reiniging en onderhoud altijd het apparaat uit, verwijder de netstekker uit het stopcontact en wacht tot het
apparaat is afgekoeld.
• Gebruik geen reinigingsmiddelen of schuurmiddelen.
• Reinig niet de binnenzijde van het apparaat.
• Probeer het apparaat niet te repareren. Indien het apparaat niet juist werkt, vervang het dan door een nieuw apparaat.
• Dompel het apparaat niet onder in water of andere vloeistoen.
• Reinig de buitenzijde van het apparaat met een zachte, vochtige doek. Droog het apparaat grondig af met een schone,
droge doek.
• Reinig de ventilatieopeningen met een zachte borstel.
Support
Breng voor hulp of als u een opmerking of suggestie heeft een bezoek aan www.nedis.com/support.
Deutsch - Beschreibung
1. CD-Fach
2. Önen-/Schließen-Taste
Das Gerät kann CD/CD-R/CD-R/CD-RW/MP3/WMA-Discs abspielen. Das Gerät kann
keine Discs abspielen, die mit urheberrechtlich geschützten Technologien codiert
sind.
• Drücken Sie die Önen-/Schließen-Taste, um die Abdeckung zu önen.
• Legen Sie die CD in das CD-Fach ein.
• Schließen Sie die Abdeckung. Das Gerät beginnt automatisch mit der
Wiedergabe der CD.
3. Lautsprecher
4. Gri
5. FM-Antenne
6. Ein-/Aus-Taste
Quellentaste
• Drücken und halten Sie die Taste, um das Gerät ein- oder auszuschalten.
• Wenn das Gerät eingeschaltet ist, drücken Sie auf die Taste, um die Quelle zu
wechseln:
CD/USB/AUX/Bluetooth/FM.
7. Lautstärkeregler • Drehen Sie den Lautstärkeregler, um die Lautstärke zu erhöhen oder zu
verringern.
8. Play/Pause-Taste
Automatische
Sendersuchlauftaste (FM)
• CD/USB/AUX/Bluetooth-Modus: Drücken Sie auf die Taste, um den Titel
wiederzugeben oder anzuhalten.
• FM-Modus: Drücken Sie auf die Taste, um den automatischen
Sendersuchlaufmodus aufzurufen. Das Gerät scannt die UKW-Stereosender
und den Speicher automatisch. Das Gerät stoppt nach Erreichen der maximalen
Anzahl von Speicherplätzen (max. 20 Radiostationen).
9. Stopptaste
Memory-Taste (FM)
• CD/USB/AUX/Bluetooth-Modus: Drücken Sie auf die Taste, um die Wiedergabe
des Titels zu beenden.
• FM-Modus: Drücken Sie die Taste, um in den FM-Speichermodus zu gelangen
(max. 20 Radiosender).
10. Kanal + Taste
Schnellvorlauftaste
Vorwärtssprungtaste
• FM-Modus: Drücken Sie auf die Taste, um den nächsten Radiosender zu wählen.
• CD/USB/AUX/Bluetooth-Modus: Drücken und halten Sie die Vorspultaste bei
laufendem Titel gedrückt.
• CD/USB/AUX-Modus: Drücken Sie auf die Taste, um den nächsten Titel zu wählen.
11. Kanal - Taste
Rückspultaste
Rückwärtssprungtaste
• FM-Modus: Drücken Sie auf die Taste, um den vorherigen Radiosender zu wählen.
• CD/USB/AUX/Bluetooth-Modus: Drücken und halten Sie die Rückspultaste bei
laufendem Titel gedrückt.
• CD/USB/AUX-Modus: Drücken Sie auf die Taste, um den vorherigen Titel zu
wählen.
12. Tuner-Up-Taste
Wiederholungstaste
• FM-Modus: Drücken Sie wiederholt die Taste, um die Funkfrequenz um +0.1MHz
einzustellen. Drücken Sie auf die Taste und halten Sie sie gedrückt, um den
automatischen Sendersuchlaufmodus aufzurufen. Das Gerät stoppt bei der
nächsten FM-Stereostation.
• CD/MP3/USB-Modus: Drücken Sie wiederholt die Taste, um den
Wiedergabemodus auszuwählen: normale Wiedergabe / Wiederholung des
aktuellen Titels / Wiederholung des aktuellen Ordners / Wiederholung aller Titel.
13. Tuner-Down-Taste
Programmiertaste
• FM-Modus: Drücken Sie wiederholt die Taste, um die Funkfrequenz um -0.1MHz
einzustellen. Drücken Sie auf die Taste und halten Sie sie gedrückt, um den
automatischen Sendersuchlaufmodus aufzurufen. Das Gerät stoppt bei der
nächsten FM-Stereostation.
• CD/MP3/USB-Modus: Drücken Sie auf die Taste, um den Programmiermodus
aufzurufen. Im Display blinken "PRG" und "P01".
- Um eine Wiedergabeliste zu erstellen: Wählen Sie die Titel mit der
Vorwärtssprungtaste und der Rückwärtssprungtaste aus. Drücken Sie die Taste,
um die Titel zu speichern (CD: max. 20 Titel / MP3: max. 99 Titel). Drücken Sie die
Play/Pause-Taste, um die programmierten Titel ab dem ersten Titel abzuspielen.
- Um eine Wiedergabeliste zu löschen: Drücken Sie während der Wiedergabe der
Playlist zweimal die Stopptaste und önen Sie das CD-Fach.
14. Display • CD/MP3/USB-Modus: Das Display zeigt die Anzahl der Titel an.
• FM-Modus: Auf dem Display erscheint die digital FM-Frequenz.
15. USB-Eingang Das Gerät kann MP3/WMA-Dateien von USB-Geräten wiedergeben.
• Verbinden Sie ein USB-Gerät mit dem USB-Eingang. Das Gerät startet
automatisch die Wiedergabe der Titel vom USB-Gerät (max. 32GB).
16. DC-Eingang • Verbinden Sie den Netzadapter mit dem DC-Eingang.
• Stecken Sie den Netzstecker des Netzadapters in die Wandsteckdose.
17. AUX-Eingang Das Gerät kann CD/MP3-Titel von Audiogeräten abspielen (nur wenn sich keine Disc
im CD-Fach bendet).
• Verbinden Sie ein AUX-Kabel mit dem AUX-Eingang des Geräts und dem
Audiogerät.
• Drücken Sie auf die Quellentaste, um Bluetooth zu wählen. Das Gerät startet
automatisch die Wiedergabe der Titel vom Audiogerät.
18. Batteriefach • Önen Sie das Batteriefach.
• Setzen Sie die Batterien (4x 1,5V R14/UM-2/C) in das Batteriefach ein.
• Schließen Sie das Batteriefach.
Bluetooth-Kopplung
Der Abstand zwischen den zu koppelnden Geräten muss kleiner als 1 Meter sein.
• Drücken Sie auf die Quellentaste, um Bluetooth zu wählen. Die Bluetooth-Funktion startet den Scanvorgang.
• Wählen Sie den Bluetooth-Scan des Mobiltelefons aus.
• Wählen Sie "SPBB100" in der Bluetooth-Geräteliste, um den Kopplungsvorgang zu starten.
Hinweis: Wenn das Bluetooth-Gerät ein Passwort benötigt, geben Sie "0000" ein.
• Ist die Kopplung erfolgreich vollzogen, bendet sich das Gerät im Wiedergabemodus.
Sicherheit
Allgemeine Sicherheit
• Lesen Sie die Bedienungsanleitung vor dem Gebrauch genau durch. Bitte bewahren Sie die Bedienungsanleitung zur
späteren Bezugnahme auf.
• Der Hersteller ist nicht schadensersatzpichtig für Folgeschäden, Sachschäden oder Personenverletzungen, die durch die
Nichtbeachtung der Sicherheitshinweise und durch unsachgemäße Handhabung des Gerätes entstanden sind.
• Verwenden Sie das Gerät nur bestimmungsgemäß. Verwenden Sie das Gerät nur für den in dieser Bedienungsanleitung
beschriebenen Zweck.
• Verwenden Sie das Gerät nicht, falls ein Teil beschädigt oder defekt ist. Ist das Gerät beschädigt oder defekt, erneuern
Sie es unverzüglich.
• Das Gerät eignet sich nur zur Verwendung in Innenräumen. Verwenden Sie das Gerät nicht im Freien.
• Das Gerät eignet sich nur für den Hausgebrauch. Verwenden Sie das Gerät nicht für den gewerblichen Gebrauch.
• Verwenden Sie das Gerät nicht an Orten mit hoher Feuchtigkeit wie beispielsweise Badezimmern oder Schwimmbädern.
• Verwenden Sie das Gerät nicht in der Nähe von Badewannen, Duschen, Becken oder anderen Behältnissen, die Wasser
enthalten.
• Verwenden Sie keine Zeitschaltuhr und kein separates Fernbedienungssystem, das das Gerät automatisch einschaltet.
• Decken Sie das Gerät nicht ab.
• Stellen Sie das Gerät auf einer stabilen achen Oberäche auf.
• Halten Sie das Gerät von entzündlichen Gegenständen fern.
Elektrische Sicherheit
• Um die Gefahr eines elektrischen Schlags zu verringern, sollte dieses Produkt bei erforderlichen Servicearbeiten
ausschließlich von einem autorisierten Techniker geönet werden.
• Bei Problemen trennen Sie das Gerät bitte von der Spannungsversorgung und von anderen Geräten.
• Verwenden Sie das Gerät nicht, falls das Netzkabel oder der Netzstecker beschädigt oder defekt ist. Ist das Netzkabel
oder der Netzstecker beschädigt oder defekt, muss das Netzkabel oder der Netzstecker vom Hersteller oder einem
autorisierten Service-Partner erneuert werden.
• Vergewissern Sie sich stets vor dem Gebrauch, dass die Netzspannung mit der Spannung auf dem Typenschild des
Geräts übereinstimmt.
• Bewegen Sie das Gerät nicht durch Ziehen am Netzkabel. Achten Sie darauf, dass sich das Netzkabel nicht verwickeln kann.
• Tauchen Sie das Gerät, das Netzkabel oder den Netzstecker nicht in Wasser oder andere Flüssigkeiten ein.
• Lassen Sie das Gerät nicht unbeaufsichtigt, während der Netzstecker mit dem Stromnetz verbunden ist.
• Verwenden Sie kein Verlängerungskabel.
Reinigung und Pege
Warnung!
• Schalten Sie das Gerät vor der Reinigung oder Pege immer aus, ziehen Sie den Netzstecker aus der Wandsteckdose und
warten Sie, bis sich das Gerät abgekühlt hat.
• Verwenden Sie keine Lösungs- oder Scheuermittel.
• Reinigen Sie das Gerät nicht von innen.
• Versuchen Sie nicht, das Gerät zu reparieren. Falls das Gerät nicht einwandfrei arbeitet, tauschen Sie es gegen ein neues aus.
• Tauchen Sie das Gerät nicht in Wasser oder andere Flüssigkeiten ein.
• Reinigen Sie das Äußere des Geräts mit einem weichen feuchten Tuch. Trocknen Sie das Gerät gründlich mit einem
sauberen trockenen Tuch ab.
• Reinigen Sie die Belüftungsönungen mit einer weichen Bürste.
Hilfe
Wenn Sie weitere Hilfe benötigen oder Kommentare oder Vorschläge für uns haben, gehen Sie bitte auf www.nedis.com/support.
Español - Descripción
1. Compartimento del CD
2. Botón de apertura/cierre
El dispositivo puede reproducir discos CD/CD-R/CD-RW/MP3/WMA. El dispositivo no
puede reproducir discos codicados con tecnologías de protección de derechos de autor.
• Pulse el botón de apertura/cierre para abrir la cubierta.
• Ponga el disco CD en el compartimento del CD.
• Cierre la cubierta. El dispositivo empieza a reproducir el CD automáticamente.
3. Altavoz
4. Asa
5. Antena FM
6. Botón de encendido/
apagado
Botón de fuente
• Pulse y mantenga pulsado el botón para encender o apagar el dispositivo.
• Cuando el dispositivo esté encendido, pulse el botón para cambiar la fuente:
CD/USB/AUX/Bluetooth/FM.
7. Mando de volumen • Gire el mando de volumen para aumentar o disminuir el volumen.
8. Botón de reproducción/
pausa
Botón de escaneo
automático de canales (FM)
• Modo CD/USB/AUX/Bluetooth: Pulse el botón para reproducir o poner en
pausa la pista.
• Modo de FM: Pulse el botón para acceder al modo de escaneo automático
de canales. El dispositivo escaneará las emisoras estéreo FM y la memoria
automáticamente. El dispositivo se detendrá después de alcanzar el número
máximo de emisoras de la memoria (máximo 20 emisoras de radio).
9. Botón de parada
Botón de memoria (FM)
• Modo CD/USB/AUX/Bluetooth: Pulse el botón para detener la pista.
• Modo de FM: Pulse el botón para acceder al modo de memoria FM (máx. 20
emisoras de radio).
10. Botón canal +
Botón de avance rápido
Botón de salto hacia delante
• Modo de FM: Pulse el botón para seleccionar la emisora de radio siguiente.
• Modo CD/USB/AUX/Bluetooth: Pulse y mantenga pulsado el botón para
avanzar rápidamente la pista actual.
• Modo CD/USB/AUX: Pulse el botón para seleccionar la pista siguiente.
11. Botón canal -
Botón de retroceso rápido
Botón de salto hacia atrás
• Modo de FM: Pulse el botón para seleccionar la emisora de radio anterior.
• Modo CD/USB/AUX/Bluetooth: Pulse y mantenga pulsado el botón para
retroceder rápidamente la pista actual.
• Modo CD/USB/AUX: Pulse el botón para seleccionar la pista anterior.
12. Botón de sintonización arriba
Botón de repetición
• Modo de FM: Pulse repetidamente el botón para sintonizar con precisión la
frecuencia de radio en +0.1MHz. Pulse y mantenga pulsado el botón para
acceder al modo de escaneo automático de canales. El dispositivo se detendrá
en la siguiente emisora estéreo FM.
• Modo CD/MP3/USB: Pulse el botón repetidamente para seleccionar el modo de
reproducción: reproducción normal / repetir la pista actual / repetir la carpeta
actual / repetir todas las pistas.
13. Botón de sintonización abajo
Botón de programación
• Modo de FM: Pulse repetidamente el botón para sintonizar con precisión la
frecuencia de radio en -0.1MHz. Pulse y mantenga pulsado el botón para
acceder al modo de escaneo automático de canales. El dispositivo se detendrá
en la siguiente emisora estéreo FM.
• Modo CD/MP3/USB: Pulse el botón para acceder al modo de programación.
"PRG" y "P01" parpadean en la pantalla.
- Para crear una lista de reproducción: Seleccione las pistas usando el botón
de salto hacia delante y el botón de salto hacia atrás. Pulse el botón para
guardar las pistas (CD: máx. 20 pistas / MP3: máx. 99 pistas). Pulse el botón
de reproducción/pausa para reproducir las pistas programadas comenzando
desde la primera pista.
- Para eliminar una lista de reproducción: Mientras se reproduce la lista de
reproducción, pulse el botón de parada dos veces y abra el compartimento
del CD.
14. Pantalla • Modo CD/MP3/USB: La pantalla muestra el número de pistas.
• Modo de FM: La pantalla muestra la frecuencia FM digital.
15. Entrada USB El dispositivo puede reproducir archivos MP3/WMA de dispositivos USB.
• Conecte un dispositivo USB a la entrada USB. El dispositivo empieza a
reproducir automáticamente las pistas del dispositivo USB (máx. 32GB).
16. Entrada CC • Conecte el adaptador de alimentación en la entrada CC.
• Inserte el enchufe de red del adaptador de alimentación en la toma de pared.
17. Entrada AUX El dispositivo puede reproducir pistas de CD/MP3 de dispositivos de audio (solo si
no hay disco en el compartimento del CD).
• Conecte un cable AUX a la entrada AUX del dispositivo y el dispositivo de audio.
• Pulse el botón de fuente para seleccionar Bluetooth. El dispositivo empieza a
reproducir automáticamente las pistas del dispositivo de audio.
18. Compartimento de las pilas • Abra el compartimento de las pilas.
• Introduzca las pilas (4x 1,5V R14/UM-2/C) en el compartimento de las pilas.
• Cierre el compartimento de las pilas.
Emparejamiento Bluetooth
La distancia entre los dispositivos a emparejar debe ser inferior a 1 metro.
• Pulse el botón de fuente para seleccionar Bluetooth. La función Bluetooth empieza a explorar.
• Seleccione la exploración Bluetooth de teléfonos móviles.
• Seleccione "SPBB100" en la lista de dispositivos Bluetooth para iniciar el proceso de emparejamiento.
Nota: Si el dispositivo Bluetooth requiere una contraseña, introduzca "0000".
• Cuando el emparejamiento haya nalizado correctamente, el dispositivo está en modo de reproducción.
Seguridad
Seguridad general
• Lea el manual detenidamente antes del uso. Conserve el manual en caso de futura necesidad.
• El fabricante no es responsable de daños consecuentes o de daños en la propiedad o en las personas causados por no
seguir estas instrucciones de seguridad y por un uso inadecuado de este dispositivo.
• Utilice el dispositivo únicamente para su uso previsto. No utilice el dispositivo con una nalidad distinta a la descrita en
el manual.
• No utilice el dispositivo si alguna pieza ha sufrido daños o tiene un defecto. Si el dispositivo ha sufrido daños o tiene un
defecto, sustitúyalo inmediatamente.
• El dispositivo sólo es apto para uso en interiores. No utilice el dispositivo en exteriores.
• El dispositivo sólo es apto para uso doméstico. No utilice el dispositivo con nes comerciales.
• No utilice el dispositivo en lugares con un nivel alto de humedad, como baños y piscinas.
• No utilice el dispositivo cerca de bañeras, duchas, lavabos u otros recipientes que contengan agua.
• No utilice un temporizador o un sistema de control remoto separado que conecte el dispositivo automáticamente.
• No cubra el dispositivo.
• Coloque el dispositivo sobre una supercie estable y plana.
• Mantenga el dispositivo alejado de objetos inamables.
Seguridad eléctrica
• Para reducir el peligro de descarga eléctrica, este producto sólo debería abrirlo un técnico autorizado cuando necesite
reparación.
• Desconecte el producto de la toma de corriente y de los otros equipos si ocurriera algún problema.
• No utilice el dispositivo si el cable de red o el enchufe de red está dañado o es defectuoso. Si el cable de red o el enchufe
de red está dañado o es defectuoso, éste debe ser sustituido por el fabricante o un servicio técnico autorizado.
• Antes del uso, compruebe siempre que la tensión de red sea la misma que se indica en la placa de características del dispositivo.
• No mueva el dispositivo tirando del cable de red. Asegúrese de que el cable de red no se enrede.
• No sumerja el dispositivo, el cable de red o el enchufe de red en agua ni otros líquidos.
• No deje el dispositivo desatendido cuando el enchufe de red esté conectado al suministro de red.
• No utilice un cable alargador.
Limpieza y mantenimiento
¡Advertencia!
• Antes de la limpieza o el mantenimiento, apague siempre el dispositivo, retire el enchufe de red de la toma de pared y
espere hasta que se haya enfriado el dispositivo.
• No utilice disolventes de limpieza ni productos abrasivos.
• No limpie el interior del dispositivo.
• No intente reparar el dispositivo. Si el dispositivo no funciona correctamente, sustitúyalo por uno nuevo.
• No sumerja el dispositivo en agua ni otros líquidos.
• Limpie el exterior del dispositivo con un paño suave humedecido. Seque bien el dispositivo con un paño limpio y seco.
• Limpie las ranuras de ventilación con un cepillo suave.
Apoyo
Si necesita ayuda adicional o si tiene comentarios o sugerencias, visite www.nedis.com/support.
Français - Description
1. Compartiment CD
2. Bouton ouvrir/fermer
L'appareil peut lire les disques CD/CD-R/CD-RW/MP3/WMA. L'appareil ne peut pas lire
les disques codés avec des technologies de protection des droits d'auteur.
• Appuyez sur le bouton ouvrir/fermer pour ouvrir le couvercle.
• Placez le disque CD dans le compartiment CD.
• Fermez le couvercle. L'appareil commence automatiquement à lire le CD.
3. Haut-parleur
4. Poignée
5. Antenne FM
6. Bouton marche/arrêt
Bouton source
• Appuyez et maintenez pour allumer /éteindre l'appareil.
• Si l'appareil est en marche, appuyez sur le bouton pour changer de source :
CD/USB/AUX/Bluetooth/FM.
7. Molette de volume • Tournez la molette de volume pour augmenter ou réduire le volume.
8. Bouton lecture/pause
Bouton de balayage
automatique de canal
(FM)
• Mode CD/USB/AUX/Bluetooth : Appuyez sur le bouton pour lire ou mettre en
pause la piste.
• Mode FM : Appuyez sur le bouton pour accéder au mode de balayage
automatique de canal. L'appareil scanne les stations stéréo FM et les mémorisent
automatiquement. L'appareil s'arrête dès qu'il atteint le nombre maximum de
stations en mémoire (maxi. 20 stations de radio).
9. Bouton arrêt
Bouton mémoire (FM)
• Mode CD/USB/AUX/Bluetooth : Appuyez sur le bouton pour arrêter la lecture de
la piste.
• Mode FM : Appuyez sur le bouton pour accéder au mode mémoire FM (maxi. 20
stations de radio).
10. Bouton canal +
Bouton avance rapide
Bouton saut en avant
• Mode FM : Appuyez sur le bouton pour sélectionner la station de radio suivante.
• Mode CD/USB/AUX/Bluetooth : Appuyez sur le bouton sans le relâcher pour une
avance rapide dans la piste active.
• Mode CD/USB/AUX : Appuyez sur le bouton pour sélectionner la piste suivante.
11. Bouton canal -
Bouton retour rapide
Bouton saut en arrière
• Mode FM : Appuyez sur le bouton pour sélectionner la station de radio précédente.
• Mode CD/USB/AUX/Bluetooth : Appuyez sur le bouton sans le relâcher pour un
recul rapide dans la piste active.
• Mode CD/USB/AUX : Appuyez sur le bouton pour sélectionner la piste précédente.
12. Bouton syntonisation
haut
Bouton répéter
• Mode FM : Appuyez sur le bouton de manière répétée pour ajuster précisément
la fréquence radio par intervalles de +0,1MHz. Appuyez sur le bouton sans le
relâcher pour accéder au mode de balayage automatique de canal. L'appareil
s'arrête à la station stéréo FM suivante.
• Mode CD/MP3/USB : Appuyez sur le bouton de manière répétée pour sélectionner
le mode de lecture : lecture normale / répéter la piste active / répéter le dossier
actif / répéter toutes les pistes.
13. Bouton syntonisation bas
Bouton programmation
• Mode FM : Appuyez sur le bouton de manière répétée pour ajuster précisément
la fréquence radio par intervalles de -0,1MHz. Appuyez sur le bouton sans le
relâcher pour accéder au mode de balayage automatique de canal. L'appareil
s'arrête à la station stéréo FM suivante.
• Mode CD/MP3/USB : Appuyez sur le bouton pour accéder au mode
programmation. "PRG" et "P01" clignotent à l'achage.
- Création de liste de lecture : Sélectionnez les pistes avec le bouton saut en avant
et le bouton saut en arrière. Appuyez sur le bouton pour enregistrer les pistes (CD
: maxi. 20 pistes / MP3 : maxi. 99 pistes). Appuyez sur le bouton lecture/pause pour
lire les pistes programmées en commençant par la première.
- Suppression de liste de lecture : Pendant la lecture de la liste de lecture, appuyez
sur le bouton arrêt deux fois et ouvrez le compartiment CD.
14. Achage • Mode CD/MP3/USB : L'achage indique le nombre de pistes.
• Mode FM : L'achage indique la fréquence FM numérique.
15. Entrée USB L'appareil peut lire les chiers MP3/WMA des appareils USB.
• Connectez un appareil USB à l'entrée audio. L'appareil démarre automatiquement
la lecture des pistes de l'appareil USB (maxi. 32Go).
16. Entrée CC • Connectez l'adaptateur d'alimentation à l'entrée CC.
• Insérez la che secteur de l'adaptateur d'alimentation dans la prise murale.
17. Entrée AUX L'appareil peut lire les pistes CD/MP3 des appareils audio (uniquement si le
compartiment CD ne contient aucun disque).
• Connectez un câble AUX à l'entrée AUX de l'appareil et du dispositif audio.
• Appuyez sur le bouton source pour sélectionner Bluetooth. L'appareil démarre
automatiquement la lecture des pistes de l'appareil audio.
18. Compartiment de pile • Ouvrez le compartiment de pile.
• Insérez les piles (4x 1,5V R14/UM-2/C) dans le compartiment de pile.
• Fermez le compartiment de pile.
Appariement Bluetooth
La distance entre les appareils à associer doit être inférieure à 1 mètre.
• Appuyez sur le bouton source pour sélectionner Bluetooth. La fonction Bluetooth démarre le balayage.
• Sélectionnez le balayage Bluetooth de portable.
• Sélectionnez "SPBB100" dans la liste des appareils Bluetooth pour démarrer le processus d'appariement.
Remarque: Si l'appareil Bluetooth demande un mot de passe, saisissez "0000".
• Si l'appariement est réussi, l'appareil passe en mode lecture.
Sécurité
Sécurité générale
• Lisez attentivement le manuel avant usage. Conservez le manuel pour toute référence ultérieure.
• Le fabricant décline toute responsabilité pour les dommages ou blessures consécutifs causés par le non-respect des
consignes de sécurité et d'une utilisation inappropriée de l'appareil.
• Utilisez l'appareil uniquement pour son usage prévu. N'utilisez pas l'appareil à d'autres ns que celles décrites dans le manuel.
• N'utilisez pas l'appareil si une pièce quelconque est endommagée ou défectueuse. Si l'appareil est endommagé ou
défectueux, remplacez-le immédiatement.
• L'appareil est conçu exclusivement pour une utilisation en intérieur. N'utilisez pas l'appareil à l'extérieur.
• L'appareil est conçu exclusivement pour un usage domestique. N'utilisez pas l'appareil à des ns commerciales.
• N'utilisez pas l'appareil dans des endroits très humides, ainsi les salles de bains et piscines.
• N'utilisez pas l'appareil à proximité d'une baignoire, d'une douche, d'un lavabo ou d'autres récipients contenant de l'eau.
• N'utilisez pas une minuterie ou une télécommande de mise en marche automatique de l'appareil.
• Ne couvrez pas l'appareil.
• Placez l'appareil sur une surface stable et plane.
• Maintenez l'appareil à l'écart des objets inammables.
Sécurité électrique
• Pour réduire le risque de choc électrique, ce produit doit être ouvert uniquement par un technicien qualié si une
réparation s'impose.
• Débranchez l'appareil et les autres équipements du secteur s'il y a un problème.
• N'utilisez pas l'appareil si le cordon d'alimentation ou la che secteur est endommagé ou défectueux. Si le cordon
d'alimentation ou la che secteur est endommagé ou défectueux, il doit être remplacé par le fabricant ou par un
réparateur agréé.
• Avant toute utilisation, vériez que la tension du secteur correspond à celle indiquée sur la plaque signalétique de
l'appareil.
• Ne déplacez pas l'appareil en le tirant par le cordon d'alimentation. Assurez-vous que le cordon d'alimentation ne
s'enchevêtre pas.
• N'immergez pas l'appareil, le cordon d'alimentation ou la che secteur dans l'eau ou d'autres liquides.
• Ne laissez pas l'appareil sans surveillance si la che secteur est branchée.
• N'utilisez aucune rallonge.
Nettoyage et entretien
Avertissement!
• Avant le nettoyage ou l'entretien, arrêtez toujours l'appareil, débranchez la che secteur de la prise murale et attendez
que l'appareil refroidisse.
• N'utilisez pas de solvants ni de produits abrasifs.
• Ne nettoyez pas l'intérieur de l'appareil.
• Ne tentez pas de réparer l'appareil. Si l'appareil fonctionne mal, remplacez-le par un neuf.
• Ne plongez pas l'appareil dans l'eau ou autres liquides.
• Nettoyez l'extérieur de l'appareil avec un chion doux et humide. Séchez soigneusement l'appareil avec un chion
propre et sec.
• Nettoyez les ouvertures de ventilation avec une brosse douce.
Support
Si vous avez des commentaires, des suggestions ou besoin d'aide, veuillez visiter www.nedis.com/support.


Λάβετε μέρος στη συζήτηση σχετικά με αυτό το προϊόν
Εδώ μπορείτε να μοιραστείτε τη γνώμη σας για το Nedis SPBB100BK Στερεοφωνικό σετ. Εάν έχετε κάποια ερώτηση, διαβάστε πρώτα προσεκτικά το εγχειρίδιο. Το να ζητήσετε ένα εγχειρίδιο μπορεί να γίνει χρησιμοποιώντας τη φόρμα επικοινωνίας μας.