
GB/CY GB/CY
GB/CY GB/CY GB/CY GB/CY GB/CY GB/CY GB/CY GB/CY GB/CY GB/CY
GB/CY GB/CY GB/CY GB/CY GB/CY GB/CY GB/CY GB/CY GB/CY GB/CY
GB/CY GB/CY GB/CY GB/CY GB/CY
Натиснете произволен бутон, за да го акти-
вирате отново. Функционалното показание
8
показва в кой режим се намирате в
момента.
Натиснете повторно бутон MODE
11
, за да
прелистите различните режими.
Натиснете бутона SET
12
, за да отидете във
второто ниво на всяка функция.
Натиснете и задръжте бутона SET, за да про-
верите или нулирате запаметените стойности.
Компютърът за велосипед разполага
със следните функции:
Функции за напреднали:
CLOCK > TOTALODO > TOTAL-TM >
TRIPDIST >
MAXSPEED
> AVGSPEED > TRIPTIME > TEMP >
STPWATCH >
CAL RATE > CALORIE > FAT-BURN >
KM+/- > TIME+/- > SCAN
Функции за начинаещи:
TRIPDIST > AVGSPEED > TRIPTIME
BG
BG
Обем на доставка
1 универсален компютър за велосипед
1 фиксатор за компютър за велосипед
1 магнит
1 сензор
6 кабелни връзки
1 батерия 3 V
, тип CR2032 бутонен елемент
1 ръководство за експлоатация
Общи указания за
безопасност
СЪХРАНЯВАЙТЕ ВСИЧКИ УКАЗАНИЯ ЗА
БЕЗОПАСНОСТ И ИНСТРУКЦИИ ЗА ПО-НА-
ТАТЪШНИ СПРАВКИ!
Този уред може да се използва от деца над
8 годишна възраст, както и от лица с огра-
ничени физически, сензорни и умствени
способности или без опит и знания, ако са
GB/CY BG BG
Press the SET key and keep it pressed to return
to normal operating mode.
Note: Once the batteries are removed, all stored
data will be erased after approx. 20 seconds.
Troubleshooting
Note: This device has delicate electronic compo-
nents. Therefore interference may occur when it is
near devices which transmit radio signals.
- If errors occur in the display, remove any such
devices from the vicinity of the product. In the case
of such malfunctions, remove the battery briefly
and then reinsert again.
Repeat this process for all the remaining digits.
You move on to selecting the servicing interval.
Press the MODE button repeatedly until the
desired
number of units of distance to your next
in
tended bicycle service appears in the LC
display.
Note: You have the choice of 200, 400, 600
or 800 km or miles.
Confirm your choice by pressing the SET button.
You move on to selecting the unit of temperature.
Press the MODE button repeatedly until °C or
°F appears in the LC display.
Confirm your choice by pressing the SET button.
You have now completed the the basic settings.
Using the bike computer
Note: If the bike computer remains unused for
more than 5 minutes, it automatically switches
into the stand-by mode. Press any button to
– Odometer (countdown or forwards)
– Total odometer and total cycling time display
– Calories
– Fat-burning
– Scan indicator (functions displayed in
continuous loop)
– Backlight
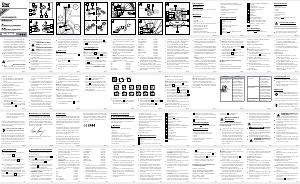
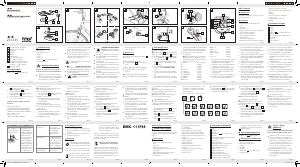
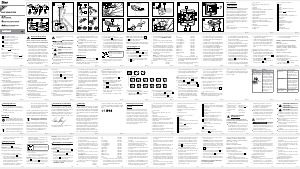
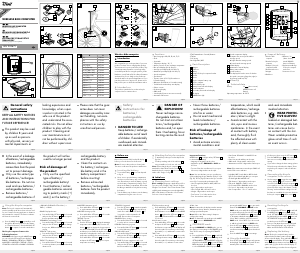
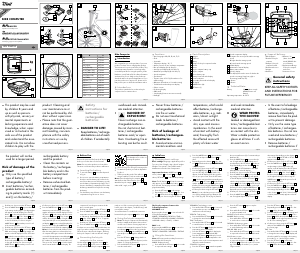
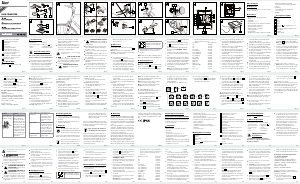
Description of parts
1a
Bracket
1b
Sensor
2
Magnet
3
Battery 3 V , type CR2032 button cell
4
Cable tie
5
Bike computer’s battery compartment cover
6
Bike computer
7
LC display
8
Function indicator
9
Secondary function value display
BG BG BG BG BG BG BG BG BG
BG
Bike Computer
Proper use
The product is intended for use as a cycle computer.
Not for commercial use.
Functions
– Menu languages: GB, DE, FR, NL, IT, ES
– Clock
– Stopwatch
– Temperature °C / °F
– Memory function for min. and max. temperature
– Current speed (0–99.9 km / h)
– Mean speed (0–99.9 km / h)
– Highest speed (0–99.9 km / h)
– Speed comparison
– Acceleration and deceleration
– Trip timer (max. 9:59:59) (countdown or forwards)
10
Primary function value display
11
MODE button
12
SET button
13
SCAN indicator
14
Servicing interval indicator
15
Speed comparison indicato
r
16
Acceleration / deceleration indicator:
Acceleration – anticlockwise
rotation
Decelerat
ion – clockwise rotation
17
Battery state indicator
Technical data
Battery: 3 V (CR2032 button cell)
Included items
1 Bike computer
1 Bike computer bracket
1 Magnet
1 Sensor
6 Cable ties
1 Battery 3 V
, type CR2032 button cell
1 Operating instructions
General safety advice
KEEP ALL THE SAFETY ADVICE AND INSTRUC-
TIONS IN A SAFE PLACE FOR FUTURE REFERENCE!
This appliance can be used by children aged
from 8 years and above and persons with
reduced physical, sensory or mental capabilities
or lack of experience and knowledge if they
have been given supervision or instruction
concerning use of the appliance in a safe way
and understand the hazards involved. Children
shall not play with the appliance. Cleaning
and user maintenance shall not be made by
children without supervision.
Please note that the warranty does not cover
damage arising from improper treatment, non-
observance of the operating instructions and
safety advice or unauthorised use.
Safety advice concerning
batteries
RISK OF LOSS OF LIFE!
If batteries are swallowed, it can lead to loss of
life. Seek medical attention if a battery is swal
lowed.
Remove the battery if the product is not to be
used for a long period.
CAUTION! RISK OF EXPLO-
SION! Never recharge single-use
batteries!
CAUTION! DANGER OF EXPLO-
SION! Always replace all batteries
at the same time and only use batte
ries
of the same type.
If the battery is exhausted, remove it from the
device immediately. Otherwise the battery is
more likely to leak.
Make sure you insert the battery the right way
round (polarity).
Keep the battery away from children. Do not
throw the battery into a fire. Never short-circuit
it or take it apart.
If your battery leaks, remove it from the device
immediately to prevent the device from being
damaged.
Do not let the fluid from a leaking battery come
into contact with your skin, eyes or mucous
membranes. In the event of contact with fluid
leaking from a battery, thoroughly flush the
affected area with water and / or seek the
advice of a doctor!
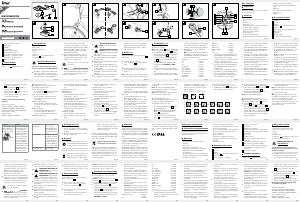
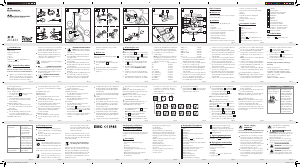
Before use
Remove the protective foil from the LC display
7
before first use.
Inserting the battery
To insert the battery
3
, proceed as shown in
Fig. A.
Attaching the bike computer
To attach the device, proceed as shown in
Figs. B to I.
Note: Make sure the cable is attached properly. It
must not get caught in the spokes or trail along them.
Preparing for use
Basic settings
Note: The LC display
7
comes on automatically
approx. 2 seconds after the battery
3
is inserted.
You are immediately offered a choice of languages.
Press the MODE-button
11
repeatedly until the
desired language appears.
Confirm your choice by pressing the SET but-
ton
12
. You move on automatically to select
the user profile.
Press the MODE button repeatedly until the
desired
user profile (ADVANCE or EASY)
appears.
Confirm your choice by pressing the SET but-
ton. Now you can choose the wheel size (SET
WS).
A four-digit number appears in the LC display.
Now enter the tyre circumference of your wheel
in mm. Press the MODE button repeatedly until
the desired number appears as the first digit.
Confirm your choice by pressing the SET button.
Repeat this process for each of the three
remaining digits.
Note: You can calculate your tyre
circumference
by multiplying your
tyre diameter by 3.1416.
The following list contains the tyre circumfer
ences
of the most common cycle tyres.
Tyre diameter Tyre circumference
20” 1598 mm
22” 1759 mm
24” 1916 mm
26” (650 A) 2073 mm
26.5” (tubular) 2117 mm
26.6” (700x25C) 2124 mm
26.8” (700x28C) 2136 mm
27” (700x32C) 2155 mm
28” (700B) 2237 mm
ATB24”x1.75 1888 mm
ATB26 x1.4 1995 mm
ATB26 x1.5 2030 mm
ATB26 x1.75 2045 mm
ATB26x2 (650B) 2099 mm
27”x1 2138 mm
27”x1 1 / 4 2155 mm
Now select your desired unit of distance. Press
the MODE button repeatedly until SET KM or
SET MILE appears in the LC display.
Confirm your choice by pressing the SET button.
You move on to entering your age.
A two-digit number appears in the LC display.
Now enter your age. Press the MODE button
repeatedly until the desired number appears
as the first digit.
Confirm your choice by pressing the SET butto
n.
Repeat this process for the remaining digit. You
move on to selecting the unit of weight.
Press the MODE button repeatedly until SET
KG or SET LB appears in the LC display.
Confirm your choice by pressing the SET button.
You move on to entering your weight.
A three-digit number appears in the LC display.
Now enter your weight. Press the MODE button
repeatedly until the desired number appears
as the first digit.
Confirm your choice by pressing the SET button.
Repeat this process for all the remaining digits.
You move on to selecting the time format.
Press the MODE button repeatedly until 12 for
the 12-hour format or 24 for the 24-hour format
appears in the LC display.
Confirm your choice by pressing the SET button.
You move on to setting the time.
A four-digit number appears in the LC display.
Enter the current time. Press the MODE button
repeatedly until the desired number appears
as the first digit.
Confirm your choice by pressing the SET button.
reactivate the computer. The function indicator
8
shows the current mode.
Press the MODE button
11
repeatedly to
page through the various modes.
Press the SET button
12
to change into the sec-
ondary function for any function.
Press the SET button and keep it pressed to call
or reset up any saved values.
The bike computer has the following
functions:
Advanced users’ functions:
CLOCK > TOTALODO > TOTAL-TM >
TRIPDIST >
MAXSPEED
> AVGSPEED > TRIPTIME > TEMP >
STPWATCH >
CAL RATE > CALORIE > FAT-BURN >
KM+/- > TIME+/- > SCAN
Beginners’ functions:
TRIPDIST > AVGSPEED > TRIPTIME
Using functions
Note: All the functions and secondary functions
are described in the following list.
CLOCK: - Displays the time
Press the SET button
12
and keep it
pressed for
3 seconds to access the time settings.
TOTAL ODO: - Total odometer
Press the SET button and keep it pressed for
3seconds to access the wheel size settings
and total distance.
TOTAL-TM: Total time cycling
Press the SET button and keep it pressed for
3seconds to make changes to the saved total
time cycling.
TRIPDIST: Trip distance
Press the SET button and keep it pressed for
3seconds to reset the trip distance, the
average speed and the trip time displays to 0.
MAXSPEED: Highest speed
Press the SET button and keep it pressed for
3seconds to reset the maximum speed display
to 0.
AVGSPEED: Average speed
TRIPTIME: Trip time
TEMP: Thermometer
Press the SET button and keep it pressed to
switch between °C and °F.
Press the SET button to display the highest tem-
perature (HI) measured so far.
Press the SET button again to display the low-
est temperature (LO) measured so far.
Press and hold down the SET button while the
highest or lowest temperature is displayed to
switch back to the current temperature to
reset the saved data.
STPWATCH: Stopwatch
Press the SET button to start the stopwatch.
Press the SET button again to stop the stop-
watch.
Press the SET button and keep it pressed to
reset the stopwatch to 0.
CAL RATE: Current calorie consumption
CALORIE: Calorie meter
Press the SET button and keep it pressed to
reset the calorie counter to 0.
FAT-BURN: Fat burning in grams
Press the SET button and keep it pressed to
reset the fat burning value to 0.
KM: Odometer
Press the SET button and keep it pressed to
change the odometer settings.
The LC display
7
shows the symbol for count-
ing forwards or
backwards (+ or - respectively).
Press the MODE button
11
repeatedly until the
desired symbol is shown.
Confirm your choice by pressing the SET button.
You move on to setting the distance on the
odometer.
A 5-digit number appears in the LC display. En
ter
the desired distance. Press the MODE button
repeatedly until the desired number appears
as the first digit.
Confirm your choice by pressing the SET button.
Repeat this process for all the remaining digits.
TIME: Timer
Press the SET button and keep it pressed to
change the timer settings.
The LC display shows the symbol for counting
forwards or backwards (+ or - respectively).
Press the MODE button repeatedly until the
desired symbol is shown.
Confirm your choice by pressing the SET button.
You move on to the time settings of the timer.
A 5-digit number appears in the LC display.
Enter the desired time. Press the MODE button
repeatedly until the desired number appears
as the first digit.
Confirm your choice by pressing the SET button.
Repeat this process for all the remaining digits.
SCAN: Scan
Note: The scan mode automatically switches
between the trip distance, highest speed, average
speed and trip time displays.
Note: Refer to the section on “Basic settings” to
see how you make or change settings.
CUSTOMIZE mode
Apart from the ADVANCE and EASY mode, you
can make your individual adjustments in the
CUSTOMIZE mode (see procedure).
Press and hold the MODE button
11
to enter
the CUSTOMIZE mode.
Note: By repeatedly pressing the MODE
button
11
, you can toggle between the
ADVANCE and EASY modes.
In the EASY mode, press and hold the SET
button
12
. Press the MODE button to switch
the settings on or off (e.g. time). Choose „On“,
to add the chosen adjustment to the EASY
modes. Choose „Off“, if you do not want to
add the adjustments.
Press the SET button, to confirm your entry.
Using the backlight
Press the MODE button
11
to switch on the
backlight temporarily. The backlight automati-
cally extinguishes after a short period.
Resetting the bike computer
Press the MODE button
11
and SET button
12
at the same time and keep them pressed until
{{----}} appears in the LC display
7
.
Now press the MODE button and keep it
pressed. This resets all the settings.
Note: All stored data will be deleted.
Changing the batteries
Note: The batteries of the bike computer must be
replaced when the battery symbol
17
appears on
the LC display
7
.
Press the MODE key
11
and the SET key
12
at the same time and keep them pressed until
the {{-----}} symbol appears in the LC display
7
.
To replace the battery, proceed as shown in
figure A. Make sure you fit the battery the right
way round (polarity). This is shown inside the
battery compartment.
Problem Solution
Empty LC-display or no
response after putting
the batteries in again
RESET
Remove battery. In the
area marked RESET of
the battery compartment,
touch the plus and minus
terminals at the same
time using a screwdriver.
Insert a 3V battery into
the battery compartment
in such a way
that the +
terminal points upwards.
Replace the battery cover
on the battery compart-
ment. The microprocessor
is reset and restarted.
Speed or distance are
not displayed.
Adjust magnet and
sensor correctly. -
Check that the battery is
inserted with the poles
arranged the right way
round.
Display is black The ambient temperature
is too high or the bicycle
computer was exposed
to direct sunlight for too
long. Remove appliance
from direct sunlight and
let it cool off for a while.
The LC-display shows
irregular symbols.
Remove battery and
replace it again.
Cleaning and care
Do not use any liquids or cleaning agents for
cleaning. Otherwise there is a risk of damaging
the device.
The device should only be cleaned on the out-
side with a soft dry cloth.
Disposal
The packaging is wholly composed of
environmentally friendly materials that
can
be disposed of at a local recycling centre.
Contact your local refuse disposal authority for more
details of how to dispose of your worn-out product.
In the interest of the environment, do not
throw out your product with your house-
hold refuse. Take it to a suitable centre
where it can be disposed of properly.
Your local council will be able to tell you
where the collection centres are located
and their opening times.
Defective or exhausted batteries mu
st be recycled
in accordance with Directive 2006 / 66 / EC
. Return
the batteries and / or the device through the appro-
priate collection facilities.
Pb
Improper disposal of batteries
can damage the environment!
Batteries must not be disposed of with the house-
hold refuse. They may contain toxic heavy metals
and require to be handled as special waste. The
chemical symbols of heavy metals are: Cd = cad-
mium, Hg = mercury, Pb = lead For this reason,
you must dispose of discarded batteries at a com-
munal disposal centre.
Warranty
The device has been manufactured to strict quality
guidelines and meticulously examined before delivery.
In the event of product defects you have legal rights
against the retailer of this product. Your legal rights
are not limited in any way by our warranty detailed
below.
The warranty for this device is 3 years from the date
of purchase. Should this device show any fault in
materials or manufacture within three years from the
date of purchase, we will repair or replace it - at
our choice - free of charge to you.
The warranty period begins on the date of purchase.
Please keep the original sales receipt in a safe location
.
This document is required as your proof of purchase.
This warranty becomes void if the device has been
damaged or improperly used or maintained.
The warranty applies to faults in material or manu-
facture. This warranty does not cover product parts
subject to normal wear, thus possibly considered
consumables (e.g. batteries) or for damage to fragile
parts, e.g. switches, rechargeable batteries or glass
parts.
Компютър за велосипед
Употреба по предназначение
Продуктът е предназначен да се използва като
компютър за велосипед. Не е предназначен за
професионални цели.
Функции
– Езици на менюто: GB, DE, FR, NL, IT, ES
– Часовник
– Хронометър
– Показание за температура:°C / °F
– Функция памет за min. и max. температура
– Индикация за скоростта на движение
(0–99,9 km / h)
– Показание на средната скорост (0–99,9 km / h)
–
Показание на най-високата скорост (0–99,9 km / h)
– Сравняване на скорости
– Показание за ускоряване и забавяне
– Таймер за време на движението (max. 9:59:59)
(брои назад или напред)
– Брояч на километри (брои назад или напред)
– Показание на целия километраж и цялото
време на движение
– Брояч на калории
– Показание на изгарянето на мазнини
– Сканиращо показание (всички функции се
включват)
– Осветяване на фона
Описание на частите
1a
Фиксатор
1b
Сензор
2
Магнит
3
Батерия 3 V , тип CR2032, бутонен еле
мент
4
Кабелна връзка
5
Капак на гнездото за батерии
6
Компютър за велосипед
7
LC-дисплей
8
Индикатор на функциите
9
Показание на стойността на втората функция
10
Показание на стойността на основната функция
11
Бутон MODE
12
Бутон SET
13
SCAN-показание
14
Показание на интервала на техническа
поддръжка
15
Показание на сравнението на скорости
16
Показание на ускоряване / забавяне:
Ускоряване – въртене срещу часовниковата
стрелка
Забавяне – Въртене по часовнико-
вата стрелка
17
Показание за батерия
Технически данни
Батерия: 3 V (CR2032 бутонен елемент)
под надзор или са били инструктирани за
безопасната употреба на уреда и са раз-
брали произтичащите от това опасности.
Децата не бива да играят с уреда.
Почистването и поддръжката да не се
изпълняват от деца без надзор.
Моля обърнете внимание, че гаранцията не
покрива щети, които са възникнали поради
неправилно боравене, неспазванена работ-
ните указания и указанията за безопасност
или употреба от неупълномощени лица.
Указания за безопасност
на батериите
ОПАСНОСТ
ЗА ЖИВОТА! Батериите може да бъдат
погълнати, което може да бъде опасно за
живота. Ако бъде погълната батерия, веднага
потърсете лекарска помощ.
Изваждайте батерията от устройството,
когато не използвате продукта по-дълго време.
ВНИМАНИЕ! ОПАСНОСТ ОТ
ЕКСПЛОЗИЯ! Никога не преза-
реждайте батериите!
ВНИМАНИЕ! ОПАСНОСТ ОТ
ЕКСПЛОЗИЯ! Винаги сменяйте
всички батерии едновременно и
използвайте само батерии от един и същ тип.
Незабавно отстранявайте от уреда изтоще-
ната батерия. Съществува висока опасност
от протичане!
При поставяне обърнете внимание на пра-
вилната полярност!
Дръжте батерията далече от деца, не я
хвърляйте в огън, не я свързвайте накъсо и
не я разглобявайте.
Ако батерията във Вашия уред е изтекла,
извадете я веднага за да предотвратите щети
по уреда!
Избягвайте контакта с кожата, очите и лига-
виците. При контакт с батерийна киселина
изплакнете засегнатото място обилно с вода
и / или потърсете лекар!
Преди употреба
Преди първата употреба свалете предпазното
фолио от LC-дисплея
7
.
Поставяне на батериите
За да поставите батерията
3
, процеди-
райте, както е показано на фиг. A.
Поставяне на компютъра за
велосипед
За поставяне на устройството действайте
както е показано на фигури B до I.
Указание: Обърнете внимание на коректното
поставяне на кабела. Спиците не трябва да го
захлащат, нито пък да се плъзга по тях.
Въвеждане в експлоатация
Извършване на основни
настройки
Указание: След поставяне на батерията
3
LC-дисплеят
7
се включва автоматично след
ок. 2 секунди. Отивате директно в избор на езика.
Натискайте бутона MODE
11
дотогава,
докато се появи желаният език.
Потвърдете Вашия избор чрез натискане на
бутона SET
12
. Сега отивате автоматично в
избор на потребителски профил.
Натискайте бутона MODE дотогава, докато
се появи желаният потребителски профил
(
ADVANCE
или
EASY
).
Потвърдете Вашия избор чрез натискане на
бутона SET. Сега отивате в избор на размер
на гумите (SET WS).
На LC-дисплея се появява четирицифрено
число. Въведете обиколката на гумите на
Вашия велосипед в mm. Натискайте бутона
MODE дотогава, докато се появи желаното
число като първа цифра.
Потвърдете Вашия избор чрез натискане на
бутона SET.
Повторете този процес за всяка от следва-
щите три цифри.
Указание: Може да определите обикол-
ката на Вашите гуми, като умножите диаме-
търа на гумите с 3,1416. В следващия списък
можете да намерите обиколките на гумите
на най-често срещаните велосипедни гуми.
Диаметър на гумите Обиколка
на гумите
20” 1598 mm
22” 1759 mm
24” 1916 mm
26” (650 A) 2073 mm
26,5” (Tubular) 2117 mm
26,6” (700x25C) 2124 mm
26,8” (700x28C) 2136 mm
27” (700x32C) 2155 mm
28” (700B) 2237 mm
ATB24”x1,75 1888 mm
ATB26 x1,4 1995 mm
ATB26 x1,5 2030 mm
ATB26 x1,75 2045 mm
ATB26x2 (650B) 2099 mm
27”x1 2138 mm
27”x1 1 / 4 2155 mm
Сега изберете желаната от Вас мерна
единица за дължина. Натискайте бутона
MODE доготава, докато на дисплея се появи
SET KM или SET MILE.
Потвърдете Вашия избор чрез натискане на
бутона SET. Сега отивате във въвеждането
на възраст.
На LC-дисплея се появява двуцифрено число.
Въведете Вашата възраст. Натискайте
бутона MODE дотогава, докато се появи
желаното число като първа цифра.
Потвърдете Вашия избор чрез натискане на
бутона SET.
Повторете този процес за следващата цифра.
Сега отивате в избор на мерна единица за тегло.
Натискайте бутона MODE дотогава, докато
на дисплея се появи SET KG или SET LB.
Потвърдете Вашия избор чрез натискане на
бутона SET. Сега отивате във въвеждането
на тегло.
На LC-дисплея се появява трицифрено число.
Въведете Вашето тегло. Натискайте бутона
MODE дотогава, докато се появи желаното
число като първа цифра.
Потвърдете Вашия избор чрез натискане на
бутона SET.
Повторете този процес за всички следващи
цифри. Сега отивате в избор на системата
за време.
Натискайте бутона MODE дотогава, докато
на LC-дисплея се появи 12 за 12-часов
форма или 24 за 24-часов формат.
Потвърдете Вашия избор чрез натискане на
бутона SET. Сега отивате в настройка на
часовото време.
На LC-дисплея се появява четирицифрено
число. Въведете текущото часово време.
Натискайте бутона MODE дотогава, докато
се появи желаното число като първа цифра.
Потвърдете Вашия избор чрез натискане на
бутона SET.
Повторете този процес за всички следващи
цифри. Сега отивате в избор на интервала
на техническа поддръжка.
Натискайте бутона MODE дотогава, докато
се покажат желаните от Вас километри, след
които искате да направите следващата
профилактика на Вашия велосипед.
Указание: Може да избирате между
200, 400, 600 и 800 km респ. мили.
Потвърдете Вашия избор чрез натискане на
бутона SET. Сега отивате в избор на темпе-
ратурна единица.
Натискайте бутон MODE дотогава, докато
на дисплея се появи °C или °F.
Потвърдете Вашия избор чрез натискане на
бутона SET. С това основната настройка е
приключена.
Използване на компютъра
за велосипед
Указание: Когато не използвате компютъра
за велосипеда по-дълго от 5 минути, той
превключва автоматично в лежим Stand By.
BIKE COMPUTER
Operation and Safety Notes
ΥΠΟΛΟΓΙΣΤΉΣ ΠΟΔΗΛΆΤΟΥ
Υποδείξεις χειρισμού και ασφαλείας
КОМПЮТЪР ЗА ВЕЛОСИПЕД
Инструкции за обслужване и безопасност
BIKE COMPUTER
IAN 103553
D
E
F
G
2
1b
4
4
1b
1b
2
B
A
6
3
5
1b
43 2
1a
C H
I
J
8
9
10
1112
13
14
15
16
17
2
1b
2 1b
7

Λάβετε μέρος στη συζήτηση σχετικά με αυτό το προϊόν
Εδώ μπορείτε να μοιραστείτε τη γνώμη σας για το Crivit IAN 103553 Υπολογιστής ποδηλασίας. Εάν έχετε κάποια ερώτηση, διαβάστε πρώτα προσεκτικά το εγχειρίδιο. Το να ζητήσετε ένα εγχειρίδιο μπορεί να γίνει χρησιμοποιώντας τη φόρμα επικοινωνίας μας.
απάντηση | Αυτό ήταν χρήσιμο (10) (Μεταφράστηκε από την Google)
απάντηση | Αυτό ήταν χρήσιμο (5) (Μεταφράστηκε από την Google)
απάντηση | Αυτό ήταν χρήσιμο (2) (Μεταφράστηκε από την Google)
απάντηση | Αυτό ήταν χρήσιμο (0) (Μεταφράστηκε από την Google)
απάντηση | Αυτό ήταν χρήσιμο (0) (Μεταφράστηκε από την Google)
απάντηση | Αυτό ήταν χρήσιμο (0) (Μεταφράστηκε από την Google)
απάντηση | Αυτό ήταν χρήσιμο (0) (Μεταφράστηκε από την Google)