
1 32 4
2www.AEG.com
13 14
17
16 18
5 876
9
1211
2625
19 20 22
21
15
10
23
24
3www.AEG.com
ENGLISH
Thank you for choosing AEG VX9 vacuum cleaner. Always use original
accessories and spare parts to get the best results. This product is designed
with the environment in mind. All plastic parts are marked for recycling
purposes.
BEFORE STARTING
• Read this manual carefully.
• Check that all parts described are included.
• Pay special attention to the safety precautions!
DESCRIPTION OF VX9 VACUUM CLEANER
A. Display (see versions later)
B. Exhaust filter lid
C. Exhaust filter
D. Parking slots
E. Power cord
F. Motor filter
G. Motor filter holder
H. S-bag®
I. S-bag® holder
J. Dust compartment cover
K. AeroPro 3in1 tool
L. AeroPro hose
M. AeroPro handle (see versions
later)
N. AeroPro telescopic tube
O. Parking clip
P. Display for models with rotary
knob manual control*
Q. Display for models with remote
control*
R. Display for models with remote
control and AUTO function*
S. AeroPro Classic handle*
T. AeroPro Ergo handle*
U. AeroPro Remote Control handle*
V. PrecisionFlow nozzle*
W. PrecisionFlow LED nozzle (with
front lights)*
X. AeroPro Turbo nozzle*
Y. AeroPro Mini Turbo nozzle*
Z. ParkettoPro nozzle*
AA. AeroPro FlexProPlus nozzle*
AB. AeroPro Long crevice nozzle*
* Certain models only
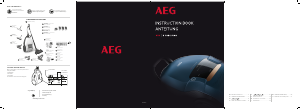
HOW TO USE THE VACUUM CLEANER
1 Open the dust compartment cover by pulling the S-BAG button. Check that
the dust bag (s-bag) is in place.
2 Insert the hose into the cleaner (to remove it, press the lock buttons and pull).
Insert the hose into the hose handle until the lock button clicks (to release it,
press the lock button
and pull).
3 Attach the telescopic tube to the nozzle. Attach the telescopic tube to the
hose handle (to remove it, press the lock button and pull).
4 Adjust the telescopic tube by holding the lock with one hand and pulling the
handle with the other hand.
STARTSTOP THE VACUUM CLEANER AND ADJUST SUCTION POWER
5 Pull out the power cord and plug it into the mains. Press the ON/OFF button
to turn the cleaner on/o. Indicators light up, MIN/MAX indicator lights up
from left to right and back (auto function models).* Models with remote con-
trol can also be operated by the ON/OFF button on the handle.*
6 Adjust suction power (manual control models): Turn the rotary knob on the
cleaner or use the air valve on the handle.*
7 Adjust suction power (remote control models): Press +/- button on the han-
dle. MIN/MAX and symbols indicators on display will show level of power.*
8 Adjust suction power (remote control models with AUTO): The cleaner starts
in AUTO mode (automatic power regulation). AUTO indicator is illuminated
on the display and MIN/MAX indicator pulses. To regulate power manually
press +/- button on handle. Press AUTO button to return to auto-function.*
9 After cleaning, push the REWIND button to rewind the cable.
PARKING POSITIONS
10 Use parking position on the side (A) or underneath (C) to carry and store the
cleaner. At the back (B) when you pause (save your back).
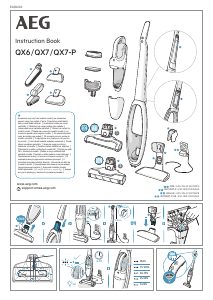
REPLACING THE DUSTBAG, SBAG®
11 Replace the s-bag when
- P* Models with rotary knob: S-BAG indicator lights up in red
- Q* Models with remote control: S-BAG symbol lights up red.
- R* Models with remote control and AUTO: S-BAG indicator lights up in red
(green light: bag is OK, yellow light: soon time to replace bag).
NB: Always change the s-bag when S-BAG indicator is illuminated or has
red light even if the s-bag is not full (it may be blocked) and after using
carpet cleaning powder. For best possible performance, use the Ultra Long
Performance bag which is especially developed for your cleaner. Other
synthetic s-bags can also be used. Do not use paper dust bags! www.s-bag.
com
12 Pull the S-BAG button to open the dust compartment. The handle of the
s-bag holder goes up. Pull the handle to remove the s-bag with holder. Do not
press the release button.
13 Hold the s-bag with holder over a dust bin. Press the button to release the
s-bag. Insert a new s-bag to the holder by inserting the cardboard at the back
of the holder.
14 Insert the s-bag with holder by pushing it straight down in its tracks. Make
sure the s-bag is not stuck under the holder. Close the lid. If the s-bag is not
properly placed or is missing, the lid will not close.
NB: When you start the cleaner after s-bag replacement, It takes 10 seconds
before the S-BAG indicator turns o (P* Models with rotary knob and Q*
Models with remote control) or turns green (R* Models with remote control
and AUTO).
REPLACING THE FILTERS
15 Replace/clean** the filter when (**washable filter only)
- P* Models with rotary knob: you have changed the s-bag 5 times
- Q* Models with remote control: FILTER symbol lights up in red
- R* Models with remote control and AUTO: filter indicator lights up in red.
Green light indicates that the filter is ok. It lights up briefly when you start the
vacuum cleaner.
16 Pull the FILTER button to open the filter lid. Use original s-filters. Remove the
filter and check the reference on the frame to define type. Replace with a new
filter or clean it**. Rinse the inside (dirty side) in lukewarm tap water. Tap the
filter frame to remove the water. Repeat the process four times. (*
*washable
filter only)
NB: Do not use cleaning agents. Avoid touching the filter surface. Let the
filter dry completely (min. 24 h in room temperature) before putting back
! Change the washable filter at least once a year or when it is very dirty or
damaged. Do not remove the L-shaped foam under the filter.
17 After replacing the filter, close the filter lid until it is clicked back into place. If
the filter lid comes o, position the hinges at the bottom and push the filter
lid until it is clicked back into place.
NB: When you start the cleaner after filter replacement, It takes 10 seconds
before the FILTER indicator turns green (models with remote control and
AUTO function) or turns o (remote control models).*
18 Replace the motor filter when dirty or after every 5th s-bag. Push the filter
holder down and pull it out. Exchange the filter and close the lid.
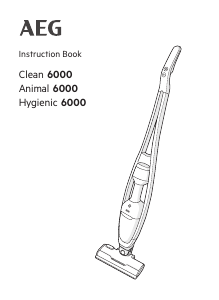
VACUUMING WITH THE UNIVERSAL NOZZLE V*, W*
19 Change nozzle setting with the pedal. Icon illustrates recommended floor
type.
20 PrecisionFlow LED nozzle*: Move the nozzle forward. The front light turns
on automatically after a few seconds. When the nozzle is not used, the light
turns o automatically after a few seconds.
CLEANING THE UNIVERSAL NOZZLE V*, W**
21 Disconnect the nozzle from the tube. Clean with the hose handle.
CLEANING THE TURBO NOZZLE X*
22 Disconnect the nozzle from the tube and remove entangled threads etc by
snipping them away with scissors. Use the hose handle to clean the nozzle. *
3IN1 ACCESSORY TOOL
23 Pull the textile tab to take out 3in1 tool. The tool has 3 functions, see pictures
on next page.
24 After usage, put it back in its place.
2www.AEG.com
2www.AEG.com
GB
DE
AR
ES
FA
FR
GR
IT
NL
PT
PRECAUÇÕES DE SEGURANÇA
Este aparelho pode ser utilizado por crianças com 8 anos ou mais e por pessoas com capacidades físicas,
sensoriais ou mentais reduzidas ou com pouca experiência e conhecimento se tiverem recebido supervisão
ou instruções relativas à utilização do aparelho de forma segura e compreenderem os perigos envolvidos.
As crianças não podem brincar com o aparelho.
A limpeza e a manutenção não devem ser efetuadas por crianças sem supervisão.
AVISO: As escovas turbo* possuem uma escova rotativa que pode aprisionar objetos. Utilize-as com cuidado
e apenas nas superfícies para as quais foram concebidas. Desligue o aspirador antes de remover qualquer
objeto que tenha ficado aprisionado e antes de limpar a escova.
As pilhas têm de ser removidas do controlo remoto da pega* / escova com luz LED* antes de o produto ser
enviado para eliminação**.
*Apenas alguns modelos.
**As instruções de remoção da pilha encontram-se na parte desdobrável das secções 25 e 26.
Desligue sempre a ficha da tomada elétrica antes de limpar ou efetuar alguma manutenção no aparelho ou
quando remover a pilha. A pilha deve ser eliminada em segurança.
Se o cabo estiver danificado, terá de ser substituído num Centro de Assistência Técnica AEG autorizado para
evitar perigos.
O aspirador VX9 só deve ser utilizado para trabalhos de aspiração normal em espaços interiores de um ambiente doméstico. Certifique-se de que o aspirador é
guardado num local seco.
Todas as ações de manutenção e reparação terão de ser efetuadas num Centro
de Assistência Técnica AEG autorizado.
Os materiais da embalagem, por exemplo, os sacos de plástico, não devem ficar
ao alcance das crianças, para evitar o perigo de asfixia.
Nunca utilize o aspirador:
Em áreas molhadas.
Perto de gases inflamáveis, etc.
Quando o produto apresentar sinais de danos visíveis.
Sobre fluidos ou objetos aguçados.
Quando a escova de chão apresentar sinais de danos visíveis.
Sobre brasas de carvão quentes ou frias, pontas de cigarro acesas, etc.
Sobre pó fino, por exemplo, gesso, cimento, farinha ou cinzas quentes ou frias.
Não deixe o aspirador exposto à luz solar direta.
Evite expor o aspirador a calor forte e temperaturas negativas.
Nunca utilize o aspirador sem os filtros instalados.
Não tente tocar no rolo-escova com o aspirador ligado nem quando o rolo-
escova estiver a rodar.
Quando as rodas estão bloqueadas.
Precauções para o cabo de alimentação
Verifique a ficha e o cabo regularmente. Nunca utilize o aspirador se existirem
danos na ficha ou no cabo.
Os danos no cabo do aspirador não estão cobertos pela garantia.
Nunca puxe ou levante o aspirador pelo cabo de alimentação.
A utilização do aspirador nas condições indicadas acima pode causar ferimentos
graves ou danificar o produto. Estes ferimentos ou danos não estão cobertos
pela garantia nem pela AEG.
ASSISTÊNCIA E GARANTIA
Todas as ações de manutenção e reparação terão de ser efetuadas num Centro
de Assistência Técnica AEG autorizado.
Os danos no cabo do aspirador não estão cobertos pela garantia. Quaisquer
danos no motor que sejam causados por aspiração de algum líquido, pela
submersão do aparelho em algum líquido ou pela utilização do aparelho com
danos na mangueira ou na escova não estão cobertos pela garantia.
Utilize sempre os sacos de aspirador s-bag originais destinados a este aspirador;
consulte a secção 11. Quaisquer danos causados no aspirador por uma utilização
incorreta de sacos de pó não originais não estão cobertos pela garantia.
ELIMINAÇÃO
This symbol on the product indicates that this product contains a
battery which shall not be disposed with normal household waste.
Este símbolo no produto indica que o produto contém uma pilha
que não pode ser eliminada juntamente com os resíduos domésticos
comuns.
Este símbolo no produto ou na respetiva embalagem indica que o
produto não pode ser tratado como um resíduo doméstico.
Para reciclar o seu produto, coloque-o num ponto de recolha oficial ou
entregue-o num Centro de Assistência Técnica AEG, onde a pilha e as
peças elétricas serão removidas e enviadas para reciclagem de forma
correta e profissional. Siga os regulamentos do seu país relativos à
recolha separada de produtos elétricos e baterias recarregáveis.
A AEG Home Care & SDA declara que o Aspirador com equipamento de rádio de
tipo HER2 e HER3 está em conformidade com a Diretiva 2014/53/UE.
NOTAS SOBRE OS REGULAMENTOS DE ETIQUETA DE ENERGIA
Este aspirador é um aspirador de uso geral.
Para conseguir a eficiência energética e o desempenho de limpeza indicados
para carpete, utilize a escova universal substituível
“PrecisionFlow / PrecisionFlow LED”.
Para conseguir o desempenho de limpeza indicado para piso rígido com
frestas, utilize a escova específica para piso rígido “Parketto Pro” quando
especificada e incluída na embalagem. Caso contrário, utilize a escova
universal substituível “PrecisionFlow / PrecisionFlow LED”.
Este livro de instruções, a ficha técnica específica do aspirador e a respetiva
etiqueta de energia podem ser obtidas por download a partir do nosso
website: www.AEG.com.
Os cálculos foram efetuados de acordo com o Regulamento Delegado pela
Comissão (UE) N.º 665/2013 de 3 de maio de 2013, que complementa a
Diretiva 2010/30/UE. Todos os procedimentos indicados nestas instruções
sem descrição muito detalhada estão em conformidade com a norma EN
60312-1:2013.
GB
DE
AR
ES
FA
FR
GR
IT
NL
PT


Λάβετε μέρος στη συζήτηση σχετικά με αυτό το προϊόν
Εδώ μπορείτε να μοιραστείτε τη γνώμη σας για το AEG VX9-4-5ST Ηλεκτρική σκούπα. Εάν έχετε κάποια ερώτηση, διαβάστε πρώτα προσεκτικά το εγχειρίδιο. Το να ζητήσετε ένα εγχειρίδιο μπορεί να γίνει χρησιμοποιώντας τη φόρμα επικοινωνίας μας.